hifiveとjQuery UIを組み合わせる【DOMの並び替え】
hifiveは業務システム開発に特化しているのでjQuery UIやBootstrapと組み合わせて使われることが多くなっています。そこで今回はよく使われるライブラリについて、その組み合わせ方を紹介します。
今回はDOMのソートです。
デモコードについて
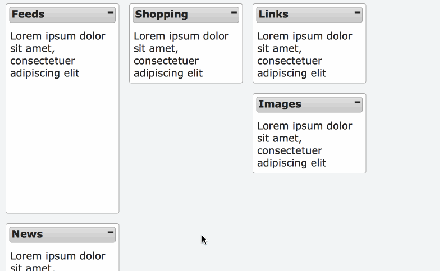
実際に動作するデモはJSFiddleにアップロードしてあります。各要素をドラッグして上下に移動したり、別なカラムにドロップできます。
HTMLについて
少し長いですがHTMLは次のようになります。portlet クラスごとに移動できます。
This file contains hidden or bidirectional Unicode text that may be interpreted or compiled differently than what appears below. To review, open the file in an editor that reveals hidden Unicode characters.
Learn more about bidirectional Unicode characters
| <div id="container" style="padding: 30px;"> | |
| <div class="column"> | |
| <div class="portlet"> | |
| <div class="portlet-header">Feeds</div> | |
| <div class="portlet-content" style="height: 320px;">Lorem | |
| ipsum dolor sit amet, consectetuer adipiscing elit</div> | |
| </div> | |
| <div class="portlet"> | |
| <div class="portlet-header">News</div> | |
| <div class="portlet-content">Lorem ipsum dolor sit amet, | |
| consectetuer adipiscing elit</div> | |
| </div> | |
| </div> | |
| <div class="column"> | |
| <div class="portlet"> | |
| <div class="portlet-header">Shopping</div> | |
| <div class="portlet-content">Lorem ipsum dolor sit amet, | |
| consectetuer adipiscing elit</div> | |
| </div> | |
| </div> | |
| <div class="column"> | |
| <div class="portlet"> | |
| <div class="portlet-header">Links</div> | |
| <div class="portlet-content">Lorem ipsum dolor sit amet, | |
| consectetuer adipiscing elit</div> | |
| </div> | |
| <div class="portlet"> | |
| <div class="portlet-header">Images</div> | |
| <div class="portlet-content">Lorem ipsum dolor sit amet, | |
| consectetuer adipiscing elit</div> | |
| </div> | |
| </div> | |
| <ul id="list" style="list-style: none;"></ul> | |
| </div> |
スタイルシートについて
スタイルシートはカラム部分の設定などになります。
This file contains hidden or bidirectional Unicode text that may be interpreted or compiled differently than what appears below. To review, open the file in an editor that reveals hidden Unicode characters.
Learn more about bidirectional Unicode characters
| .column { | |
| width: 220px; | |
| float: left; | |
| padding-bottom: 100px; | |
| } | |
| .portlet { | |
| margin: 0 1em 1em 0; | |
| } | |
| .portlet-header { | |
| margin: 0.3em; | |
| padding-bottom: 4px; | |
| padding-left: 0.2em; | |
| } | |
| .portlet-header .ui-icon { | |
| float: right; | |
| } | |
| .portlet-content { | |
| padding: 0.4em; | |
| } | |
| .ui-sortable-placeholder { | |
| border: 1px dotted black; | |
| visibility: visible !important; | |
| height: 50px !important; | |
| } | |
| .ui-sortable-placeholder * { | |
| visibility: hidden; | |
| } |
JavaScriptについて
JavaScriptは次のようになります。まずは概要です。
This file contains hidden or bidirectional Unicode text that may be interpreted or compiled differently than what appears below. To review, open the file in an editor that reveals hidden Unicode characters.
Learn more about bidirectional Unicode characters
| $(function() { | |
| var controller = { | |
| __name: 'SortableController', | |
| // 初期化処理 | |
| __ready: function() { | |
| }, | |
| // ドロップ時のコールバック | |
| stop: function(event, ui) { | |
| } | |
| }; | |
| // コントローラの作成と要素へのバインド. | |
| h5.core.controller('#container', controller); | |
| }); |
初期化処理
hifiveのコントローラが初期化された段階でソートの設定を行います。ここではドロップした時のイベント(stop)だけ指定しています。
This file contains hidden or bidirectional Unicode text that may be interpreted or compiled differently than what appears below. To review, open the file in an editor that reveals hidden Unicode characters.
Learn more about bidirectional Unicode characters
| __ready: function() { | |
| var that = this; | |
| $('.column').sortable({ | |
| connectWith: '.column', | |
| stop: that.own(that.stop) | |
| }); | |
| $('.portlet').addClass('ui-widget ui-widget-content ui-helper-clearfix ui-corner-all') | |
| .find('.portlet-header').addClass('ui-widget-header ui-corner-all').prepend( | |
| '<span class="ui-icon ui-icon-minusthick"></span>').end().find( | |
| '.portlet-content'); | |
| $('.portlet-header .ui-icon').click(function() { | |
| $(this).toggleClass('ui-icon-minusthick').toggleClass('ui-icon-plusthick'); | |
| $(this).parents('.portlet:first').find('.portlet-content').toggle(); | |
| }); | |
| $('.column').disableSelection(); | |
| }, |
ドロップ時のコールバック
次にドロップを止めた時のイベントです。
This file contains hidden or bidirectional Unicode text that may be interpreted or compiled differently than what appears below. To review, open the file in an editor that reveals hidden Unicode characters.
Learn more about bidirectional Unicode characters
| stop: function(event, ui) { | |
| var target = $(ui.item); | |
| $('#list').append('<li>' + target.find('.portlet-header').text() + 'が移動しました。</li>'); | |
| } |
このように実装することでhifiveとjQuery UIのソート機能をシームレスに連携させられるようになります。ダッシュボードであったり、ユーザが自分でコンテンツを自由に設定できるページを作るのに使えるのでぜひ参考にしてください。
実際に動作するデモはJSFiddleにアップロードしてあります。こちらも合わせてご覧ください。

コメントは受け付けていません。