hifiveはフレームワークですが、業務システムでよく使われるUIについてはライブラリとして提供しています。今回は操作中によく表示されるポップアップ、モーダル表示を行うポップアップライブラリを紹介します。
今回は表示したモーダルをドラッグで動かせるようにする方法を紹介します。実際に動いているデモはこちらにあります。アニメーションは次のようになります。

使い方
まずpopup.jsとpopup.cssを読み込みます。
This file contains hidden or bidirectional Unicode text that may be interpreted or compiled differently than what appears below. To review, open the file in an editor that reveals hidden Unicode characters.
Learn more about bidirectional Unicode characters
次にHTMLを次のように記述します。ボタンを押したらポップアップが表示されます。
This file contains hidden or bidirectional Unicode text that may be interpreted or compiled differently than what appears below. To review, open the file in an editor that reveals hidden Unicode characters.
Learn more about bidirectional Unicode characters
| <div class="sample-wrap"> | |
| <label>メッセージ表示</label><br> | |
| <button class="draggable-popup">開く</button> | |
| </div> |
JavaScriptの実装は次のようになります。ボタンをクリックされた時のイベントで、 h5.ui.popupManager.createPopup を実行します。タイトル、本文を指定して、最後に show() を実行すれば表示されます。この時、 draggable: true オプションを追加するのがポイントです。
This file contains hidden or bidirectional Unicode text that may be interpreted or compiled differently than what appears below. To review, open the file in an editor that reveals hidden Unicode characters.
Learn more about bidirectional Unicode characters
| (function($) { | |
| var pageController = { | |
| __name: 'PageController', | |
| 'button.draggable-popup click': function(context, $el) { | |
| h5.ui.popupManager.createPopup('sample', 'ドラッグ可能ポップアップ', 'サンプルです', null, { | |
| draggable: true | |
| }).show(); | |
| }, | |
| }; | |
| h5.core.expose(pageController); | |
| })(jQuery); | |
| $(function() { | |
| h5.core.controller('body', PageController); | |
| }); |
実際に動いているデモはこちらにあります。JavaScript標準のアラートに比べて表示のカスタマイズや細かなハンドリングができますのでぜひお使いください。
ポップアップ
hifiveはフレームワークですが、業務システムでよく使われるUIについてはライブラリとして提供しています。今回は操作中によく表示されるポップアップ、モーダル表示を行うポップアップライブラリを紹介します。
今回は背景が暗くならないようにする方法を紹介します。実際に動いているデモはこちらにあります。アニメーションは次のようになります。

使い方
まずpopup.jsとpopup.cssを読み込みます。
This file contains hidden or bidirectional Unicode text that may be interpreted or compiled differently than what appears below. To review, open the file in an editor that reveals hidden Unicode characters.
Learn more about bidirectional Unicode characters
次にHTMLを次のように記述します。ボタンを押したらポップアップが表示されます。
This file contains hidden or bidirectional Unicode text that may be interpreted or compiled differently than what appears below. To review, open the file in an editor that reveals hidden Unicode characters.
Learn more about bidirectional Unicode characters
| <div class="sample-wrap"> | |
| <label>メッセージ表示</label><br> | |
| <button class="modeless-popup">開く</button> | |
| </div> |
JavaScriptの実装は次のようになります。ボタンをクリックされた時のイベントで、 h5.ui.popupManager.createPopup を実行します。タイトル、本文を指定して、最後に show() を実行すれば表示されます。この時、 overlay: false オプションを追加するのがポイントです。
This file contains hidden or bidirectional Unicode text that may be interpreted or compiled differently than what appears below. To review, open the file in an editor that reveals hidden Unicode characters.
Learn more about bidirectional Unicode characters
| (function($) { | |
| var pageController = { | |
| __name: 'PageController', | |
| 'button.modeless-popup click': function(context, $el) { | |
| h5.ui.popupManager.createPopup('sample', 'モーダレスダイアログ', 'サンプルです').show({ | |
| overlay: false | |
| }); | |
| }, | |
| }; | |
| h5.core.expose(pageController); | |
| })(jQuery); | |
| $(function() { | |
| h5.core.controller('body', PageController); | |
| }); |
実際に動いているデモはこちらにあります。JavaScript標準のアラートに比べて表示のカスタマイズや細かなハンドリングができますのでぜひお使いください。
HTML5で表現力が豊かになり、APIが多数追加されたとあってもそれを活かすコードを書かなければ従来のWebと何ら変わりません。特にフォーム周りは多数の機能が追加されています。これらを使うこなすことでユーザビリティの高いフォーム機能が実現します。
今回はファイルアップロードに注目して役立つライブラリを紹介します。
JeremyFagis/dropify: Override your input files with style — Demo here : http://jeremyfagis.github.io/dropify
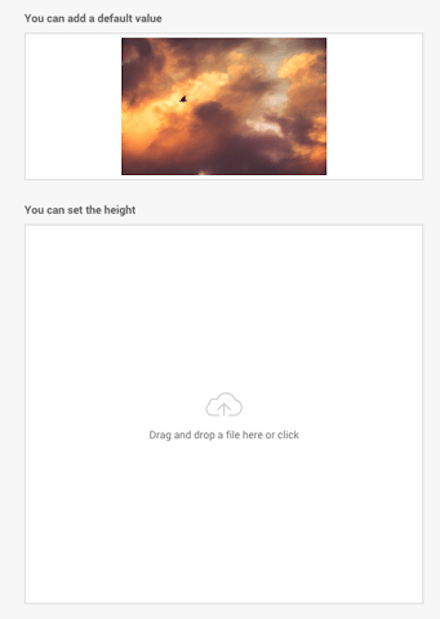
ファイルをローカルコンピュータからドラッグ&ドロップしてアップロードできます。画像の場合、サムネイルを表示します。マウスオーバーするとアニメーションがかかったりするのでユーザがファイルをドロップする場所を迷わないで済みます。
FineUploader/fine-uploader: Multiple file upload plugin with image previews, drag and drop, progress bars. S3 and Azure support, image scaling, form support, chunking, resume, pause, and tons of other features.
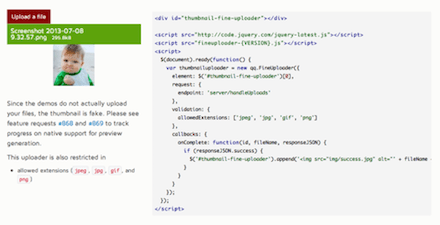
複数のファイルアップロードが可能で、画像のプレビューも備わっています。アップロード時にはプログレスバーが表示されます。さらにAmazon S3やAzureへのアップロードも可能です。
ファイルは分割アップロードされ、一旦停止したりリジュームも可能です。
taylor/html5uploader: clone of http://code.google.com/p/html5uploader/
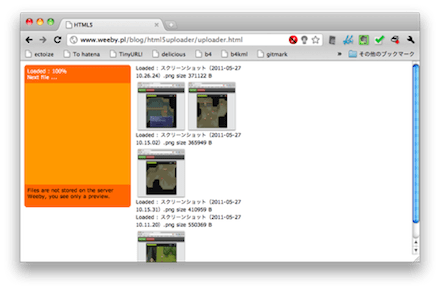
特定のDOMに対してファイルをドラッグ&ドロップでアップロードできるようになります。一旦リストにファイルを蓄積することも、すぐにファイルをアップロード開始することも可能です。
taylor/html5uploader: clone of http://code.google.com/p/html5uploader/
mihaild/jquery-html5-upload: It is a simple plugin for jQuery, which helps you to upload multiple files and to show progress of uploading.

jQueryに対応した複数ファイルのアップロードライブラリです。イベントも取れますし、途中のステータスも取得できます。jQueryなのでhifiveとの相性もいいはずです。
Rovak/InlineAttachment: Easily paste and upload files/images in plain textareas
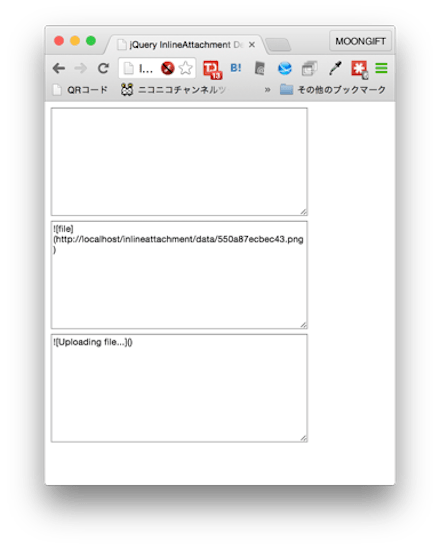
テキストエリアにファイルをドラッグ&ドロップできます。そしてファイルをAjaxでアップロードすれば、GitHubやはてなブログなどで実現されている機能相当になります。
Rovak/InlineAttachment: Easily paste and upload files/images in plain textareas
flowjs/flow.js: A JavaScript library providing multiple simultaneous, stable, fault-tolerant and resumable/restartable file uploads via the HTML5 File API.

HTML5のFile APIを使ってファイルを分割し、アップロードの再開、一時停止ができるようになります。サーバ側では送られてきた分割ファイルを後で結合する必要があるのでクライアント側だけでは完結しません。
enyo/dropzone: Dropzone is an easy to use drag’n’drop library. It supports image previews and shows nice progress bars.
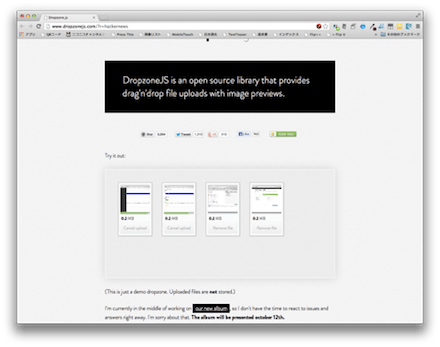
指定されたDOMに画像ファイルをアップロードすれば、サムネイルの表示と良い感じのプログレスバーが表示されます。サーバ側は特に普通のファイルとして扱えますので、どんなシステムでも利用できます。
blueimp/jQuery-File-Upload: File Upload widget with multiple file selection, drag&drop support, progress bar, validation and preview images, audio and video for jQuery. Supports cross-domain, chunked and resumable file uploads. Works with any server-side platform (Google App Engine, PHP, Python, Ruby on Rails, Java, etc.) that supports standard HTML form file uploads.

ファイルを複数選択し、それらのサムネイルを確認した上でアップロードが開始できるようになっています。個別にアップロードもできます。大量の画像をアップロードする際(さらに一旦確認が必要な場合)に便利なUIです。こちらもアップロードの一時停止、再開に対応しています。
今回紹介したライブラリではHTML5のファイルのドラッグ&ドロップ、複数ファイルの指定、File APIによるファイル分割などが使われています。従来のフォームでは難しかったこういった機能もHTML5によって容易に実現できるようになっています。
ライブラリであればシステムへの導入も容易でしょう。ぜひご利用ください。
今回は、D3.jsを利用したチャートライブラリGantt-Chartを紹介します。
Gantt-Chart概要
このガントチャートライブラリは、D3.jsをベースとしていますが、完全にそれをラップしていますので、D3そのものを学習する必要はありません。
学習コストも低く、描画部分をJavaScriptとCSSでできますので、ガントチャートをスクラッチで構築するならば、十分な選択技となるライブラリです。
とりあえず表示してみる
まずは単純なガントチャートを表示してみます。必要なライブラリとしてD3.jsが必要になります。
<body>
    http://./js/d3.v3.min.js
    http://./js/gantt-chart-d3.js
    http://./js/example1.js
</body>
example1.jsのソースコードです。
example();
function example() {

    var tasks = [
        {
            "startDate": new Date("2015/06/19 00:00:00"),
            "endDate": new Date("2015/06/23 00:00:00"),
            "taskName": "Task A",
            "status": "RUNNING"
        },
        {
            "startDate": new Date("2015/06/22 00:00:00"),
            "endDate": new Date("2015/06/27 00:00:00"),
            "taskName": "Task B",
            "status": "SUCCEEDED"
        }
    ];

    var taskNames = ["Task A", "Task B"];

    var format = "%m/%d";

    var gantt = d3.gantt().taskTypes(taskNames).tickFormat(format);
    gantt(tasks);

}
サンプル1の実行結果です。

データ記述方法
それでは、一つずつ、細かく見ていきます。まずはデータ記述方法を確認していきます。
データはオブジェクトの配列で設定します。オブジェクトには「startDate」「endDate」「taskName」「status」の4つだけと大変シンプルな構造になっています。
var tasks = [
    {
        "startDate": new Date("2015/06/19 00:00:00"),
        "endDate": new Date("2015/06/23 00:00:00"),
        "taskName": "Task A",
        "status": "RUNNING"
    }
];
- startDate
- 日付をDateオブジェクトで設定します。
- endDate
- 日付をDateオブジェクトで設定します。
- taskName
- Y軸のタスク名称を設定します。
- status
- そのグラフのステータスです。この名称はクラス名の参照にも使われます(後述)
Y軸のタスク名
タスク名称は、上記のデータオブジェクトにも記述しますが、並び順を決定するために、配列にて設定します。
var taskNames = ["Task A", "Task B"];
X軸の日付フォーマット
X軸のフォーマットはd3の日付フォーマットで記述します。以下に幾つか例を挙げます。
var format = "%m/%d"; // '06/10'
var format = "%m-%d"; // '06-10'
var format = "%H:%M"; // '12:30'
d3.jsの日付フォーマットはd3 Time Formattingを参照してください。
描画方法
最低限の描画は、次のように描画できます。taskTypesにY軸タスク名の配列、tickFormatにX軸日付フォーマットを設定します。最後に、データオブジェクトを渡せば描画されます。
var gantt = d3.gantt().taskTypes(taskNames).tickFormat(format);
gantt(tasks);
ステータス毎のスタイル設定
このライブラリで特徴的なものが、スタイルシートのクラス名の参照機能を持ち合わせていることです。これにより、tasksオブジェクトのstatusの値が、CSSのクラス名として参照されます。
以下はその記述方法です。
var tasks = [
    {
        …省略
        "status": "RUNNING"
    },
    {
        …省略
        "status": "SUCCEEDED"
    }
];

var taskStatus = {
    "SUCCEEDED": "bar",
    "FAILED": "bar-failed",
    "RUNNING": "bar-running",
    "KILLED": "bar-killed"
};
ganttのメソッドチェーンのtaskStatus()に、上記で設定したtaskStatusオブジェクトを引数として指定します。
var gantt = d3.gantt().taskTypes(taskNames).taskStatus(taskStatus).tickFormat(format);
ステータスにCSSを指定した場合の実行結果です。

主なメソッド
既に気づいていると思いますが、このライブラリは、メソッドチェーンで各項目を設定できます。以下に主なメソッドを記載します。
| メソッド | 引数 | 概要 |
|---|---|---|
| redraw | なし | 全体の再描画を行います。 |
| width | 数値(ピクセル) | グラフの表示エリアの横幅を指定します。 |
| height | 数値(ピクセル) | グラフの表示エリアの高さを指定します。 |
| timeDomainMode | “fit” or “fixed” | fitで全期間を描画します。fixedはtimeDomainで指定した期間を描画します。 |
| timeDomain | Date配列[start, end] | timeDomainModeがfixedの時に、その描画期間を指定します。 |
描画時の注意点
タスクを追加するなどのコントロールをするために redraw メソッドがありますが、データ全てを書き換えるので、大量のデータを書き換える場合は、描画パフォーマンスなどで考慮が必要になるでしょう。
また、日本語をそのまま利用すると文字化けしてしまうため、エンコードなどの工夫が必要になると思います。
あとがき
RESTなどでデータを外部から受信すれば、自由に取込んだり描画することができるでしょう。スクラッチでガントチャートを作成するならば、是非利用したいライブラリだと思います。
hifiveはフレームワークですが、業務システムでよく使われるUIについてはライブラリとして提供しています。今回は操作中によく表示されるポップアップ、モーダル表示を行うポップアップライブラリを紹介します。
実際に動いているデモはこちらにあります。アニメーションは次のようになります。
使い方
まずpopup.jsとpopup.cssを読み込みます。
This file contains hidden or bidirectional Unicode text that may be interpreted or compiled differently than what appears below. To review, open the file in an editor that reveals hidden Unicode characters.
Learn more about bidirectional Unicode characters
次にHTMLを次のように記述します。ボタンを押したらポップアップが表示されます。
This file contains hidden or bidirectional Unicode text that may be interpreted or compiled differently than what appears below. To review, open the file in an editor that reveals hidden Unicode characters.
Learn more about bidirectional Unicode characters
| <button class="normal-popup">開く</button> |
JavaScriptの実装は次のようになります。ボタンをクリックされた時のイベントで、 h5.ui.popupManager.createPopup を実行します。タイトル、本文を指定して、最後に show() を実行すれば表示されます。
This file contains hidden or bidirectional Unicode text that may be interpreted or compiled differently than what appears below. To review, open the file in an editor that reveals hidden Unicode characters.
Learn more about bidirectional Unicode characters
| (function($) { | |
| var pageController = { | |
| __name: 'PageController', | |
| 'button.normal-popup click': function(context, $el) { | |
| h5.ui.popupManager.createPopup('sample', 'モーダレスダイアログ', 'サンプルです').show(); | |
| } | |
| }; | |
| h5.core.expose(pageController); | |
| })(jQuery); | |
| $(function() { | |
| h5.core.controller('body', PageController); | |
| }); |
実際に動いているデモはこちらにあります。JavaScript標準のアラートに比べて表示のカスタマイズや細かなハンドリングができますのでぜひお使いください。
ここ数年JavaScript界隈で注目を集めたのがVirtual DOM(仮想DOM)です。DOMをJavaScriptから操作する場合、その状態を管理するのが問題になりますが、Virtual DOMではDOMの描画から開放されるのでロジックとビューの分離が可能になります。
そんなVirtual DOMを提供するライブラリを紹介します。
React – A JavaScript library for building user interfaces
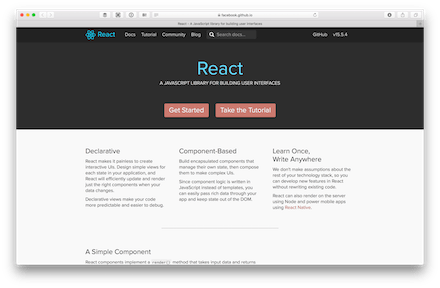
Virtual DOMを最初に広めたのがReactです。画期的な概念であり、JavaScriptプログラマにとって大きな変革になりました。次期バージョンからReact Fiberとなり、レンダリング処理などが高速化すると言われています。
元々Virtual DOMによってDOMとは切り離された技術になっていますので、React Nativeによってスマートフォンアプリの描画に使われたり、コミュニティベースではReact CanvasでCanvasへの描画、React Consoleというコンソールアプリケーション開発用のソフトウェアも作られています。
React – A JavaScript library for building user interfaces
Vue.js

Reactが独自のタグを定義するのに対してVue.jsでは元々のHTMLタグを活用したVirtual DOM利用ができます。そのため学習コストが低く、利用者が増えています。Reactと同じようにサーバサイドレンダリングにも対応しています。
シンプルな仕組みで、ランタイムもコンパクトです。Virtual DOMの仕組みも高速なのが売りです。
Maquette

ReactはJSXを覚える必要がありますが、Maquetteは純粋なJavaScriptだけで記述できます。以下はサンプルコードです。
This file contains hidden or bidirectional Unicode text that may be interpreted or compiled differently than what appears below. To review, open the file in an editor that reveals hidden Unicode characters.
Learn more about bidirectional Unicode characters
| var yourName = ''; // Piece of data | |
| // Plain event handler | |
| function handleNameInput(evt) { | |
| yourName = evt.target.value; | |
| } | |
| // This function uses the 'hyperscript' notation to create the virtual DOM. | |
| function renderMaquette() { | |
| return h('div', [ | |
| h('input', { | |
| type: 'text', placeholder: 'What is your name?', | |
| value: yourName, oninput: handleNameInput | |
| }), | |
| h('p.output', ['Hello ' + (yourName || 'you') + '!']) | |
| ]); | |
| } | |
| projector.append(domNode, renderMaquette); |
GZip圧縮すると3KBになるというコンパクトなサイズも売りです。
Preact | Preact: Fast 3kb React alternative with the same ES6 API. Components & Virtual DOM.

Reactの代替と銘打っているライブラリです。React向けに作られているコンポーネントがそのまま使えるようになっているのがポイントです。
This file contains hidden or bidirectional Unicode text that may be interpreted or compiled differently than what appears below. To review, open the file in an editor that reveals hidden Unicode characters.
Learn more about bidirectional Unicode characters
| export default class TodoList extends Component { | |
| state = { todos: [], text: '' }; | |
| setText = e => { | |
| this.setState({ text: e.target.value }); | |
| }; | |
| addTodo = () => { | |
| let { todos, text } = this.state; | |
| todos = todos.concat({ text }); | |
| this.setState({ todos, text: '' }); | |
| }; | |
| render({ }, { todos, text }) { | |
| return ( | |
| <form onSubmit={this.addTodo} action="javascript:"> | |
| <input value={text} onInput={this.setText} /> | |
| <button type="submit">Add</button> | |
| <ul> | |
| { todos.map( todo => ( | |
| <li>{todo.text}</li> | |
| )) } | |
| </ul> | |
| </form> | |
| ); | |
| } | |
| } |
パフォーマンスやサイズに重点を置いており、Reactを使っている方の悩みを解決する存在と言えそうです。
Preact | Preact: Fast 3kb React alternative with the same ES6 API. Components & Virtual DOM.
WebReflection/hyperHTML: A Fast & Light Virtual DOM Alternative
hyperHTMLはシンプルなVirtual DOMライブラリとなっています。onclickなどは別な関数を定義して、そちらに飛ばす仕組みになっています。以下はサンプルコードです。
This file contains hidden or bidirectional Unicode text that may be interpreted or compiled differently than what appears below. To review, open the file in an editor that reveals hidden Unicode characters.
Learn more about bidirectional Unicode characters
| // this is hyperHTML | |
| function tick(render) { | |
| render` | |
| <div> | |
| <h1>Hello, world!</h1> | |
| <h2>It is ${new Date().toLocaleTimeString()}.</h2> | |
| </div> | |
| `; | |
| } | |
| setInterval(tick, 1000, | |
| hyperHTML.bind(document.getElementById('root')) | |
| ); |
WebReflection/hyperHTML: A Fast & Light Virtual DOM Alternative
anthonyshort/deku: Render interfaces using pure functions and virtual DOM
Reduxと組み合わせて使うこともできるVirtual DOMライブラリです。軽量なReactといった雰囲気があります。ピュアなJavaScriptで記述できるのがポイントです。
This file contains hidden or bidirectional Unicode text that may be interpreted or compiled differently than what appears below. To review, open the file in an editor that reveals hidden Unicode characters.
Learn more about bidirectional Unicode characters
| /** @jsx element */ | |
| import {element, createApp} from 'deku' | |
| import {createStore} from 'redux' | |
| import reducer from './reducer' | |
| // Dispatch an action when the button is clicked | |
| let log = dispatch => event => { | |
| dispatch({ | |
| type: 'CLICKED' | |
| }) | |
| } | |
| // Define a state-less component | |
| let MyButton = { | |
| render: ({ props, children, dispatch }) => { | |
| return <button onClick={log(dispatch)}>{children}</button> | |
| } | |
| } | |
| // Create a Redux store to handle all UI actions and side-effects | |
| let store = createStore(reducer) | |
| // Create an app that can turn vnodes into real DOM elements | |
| let render = createApp(document.body, store.dispatch) | |
| // Update the page and add redux state to the context | |
| render( | |
| <MyButton>Hello World!</MyButton>, | |
| store.getState() | |
| ) |
Reactで書いた場合の半分くらいのサイズになるようです。
anthonyshort/deku: Render interfaces using pure functions and virtual DOM
Virtual DOMはWebアプリケーションが大型化していく中で見逃せない概念になっています。かといってReactやVue.jsで開発するのに苦痛を感じる方もいるでしょう。そうした時にはVirtual DOMのライブラリを採用するのも手でしょう。
DOMの状態管理が大変になってきていたら導入を検討してみてはいかがでしょう。
カレンダーコンポーネントの使い方、第五弾です。今回はカレンダーの日付にマーキングをします。デモはこちらにあります。実際に動いているところは下記の画像で確認できます。

日付を指定しておいて、マーカーを付けるボタンをクリックすると日付のところにマークが付きます。
HTMLの形
HTMLは次のようになります。マーカーをつけるためのボタンを設置します。
This file contains hidden or bidirectional Unicode text that may be interpreted or compiled differently than what appears below. To review, open the file in an editor that reveals hidden Unicode characters.
Learn more about bidirectional Unicode characters
| <div id="container"></div> | |
| <p> | |
| <button id="marker">マーカーをつける</button> | |
| </p> |
JavaScript側の処理
そしてJavaScritp側ではカレンダーコンポーネントの読み込みと、ボタンを押した時の処理を実装します。
This file contains hidden or bidirectional Unicode text that may be interpreted or compiled differently than what appears below. To review, open the file in an editor that reveals hidden Unicode characters.
Learn more about bidirectional Unicode characters
| $(function(){ | |
| var disableDates = []; | |
| var mainController = { | |
| __name : 'h5.ui.container.MainController', | |
| calendarController: h5.ui.components.Calendar, | |
| __meta : { | |
| calendarController: { | |
| rootElement: '#container' | |
| }, | |
| }, | |
| __init: function(){ | |
| this.$find(".select:first").attr("checked", true); | |
| }, | |
| '#marker click': function(context, $el) { | |
| var dates = this.calendarController.getSelectedDate(); | |
| for (var i=0; i<dates.length; i++) { | |
| this.calendarController.setMarker(dates[i], true); | |
| } | |
| }, | |
| }; | |
| h5.core.controller('body', mainController); | |
| }); |
ボタンを押した時の処理は次のようになります。calendarController.setMarkerに日付と、マーカーをつけるか否かを二つ目の引数で指定します。日付の選択は複数可能なので、配列を順番に処理しています。
This file contains hidden or bidirectional Unicode text that may be interpreted or compiled differently than what appears below. To review, open the file in an editor that reveals hidden Unicode characters.
Learn more about bidirectional Unicode characters
| '#marker click': function(context, $el) { | |
| var dates = this.calendarController.getSelectedDate(); | |
| for (var i=0; i<dates.length; i++) { | |
| this.calendarController.setMarker(dates[i], true); | |
| } | |
| }, |
今回のデモはこちらで確認できます。カレンダーの中で特別な日付にマーカーを付けたり、データの有無をフラグで示したいと言った時に使えるでしょう。
タイマーや時計といったソフトウェアは昔から存在します。ポモドーロテクニック(キッチンタイマーを使って25分間集中して作業する)が流行ると、キッチンタイマー風アプリが多数作られるなど、常に新しいタイマーが様々なプラットフォームで作られています。
今回はそうしたタイマーアプリケーションの中でもWebブラウザ上で動作するものを紹介します。
hoto17296/TopicTimer
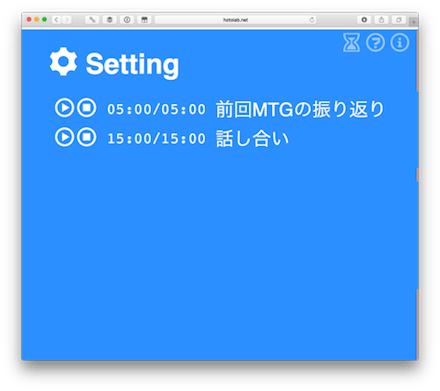
ミーティングやプレゼンテーションで使えるタイムキーピングアプリケーションです。トピックと時間を決めたら、後はクリックでタイマーがカウントダウン開始します。
builderscon/session-timer: [WIP] The Official? builderscon Session Timer
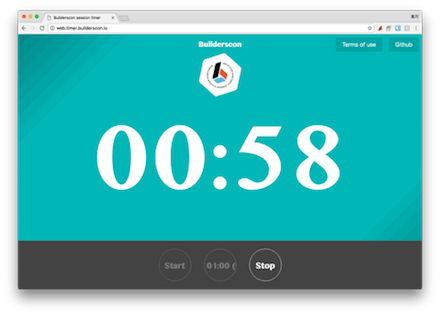
Buildersconのセッションタイマーです。デフォルトで60分のタイマーとなっています。スタートボタンを押すとカウントダウンが開始します。60分の設定であれば、30分/45分50分の3回ベルが鳴る仕組みになっています。
builderscon/session-timer: [WIP] The Official? builderscon Session Timer
objectivehtml/FlipClock
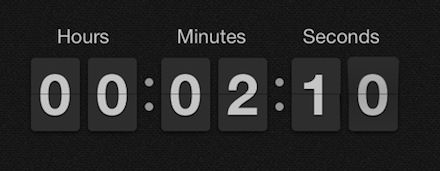
フリップ形式のタイマーを作成できるライブラリです。カウントアップもカウントダウンもサポートされています。ティザーサイトなどで後何日で公開すると言った時に使えそうです。
Frerit/epiclock: Automatically exported from code.google.com/p/epiclock
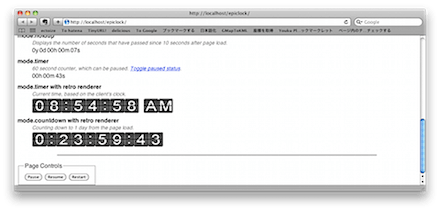
jQueryプラグインとして作られているタイマーです。カウントアップ、カウントダウン両方に対応しています。AM/PM表示や24時間表示など細かい表示設定にも対応しています。
Frerit/epiclock: Automatically exported from code.google.com/p/epiclock
nhat-nguyen/sereny: a material-design-inspired countdown timer

マテリアルデザインなカウントダウンタイマーです。デザイン自体の格好良さもありますが、カウントダウンが完了すると数字の部分がバウンドするようなアニメーションがおきます。
nhat-nguyen/sereny: a material-design-inspired countdown timer
maruta/timekeeper: HTML5 and JavaScript based timer with notification chime for academic conference

数字がとても大きく見やすいタイマーです。直感的な操作が可能で、カスタマイズも難しくありません。最大3回までベルを鳴らすタイミングを設定できます。
maruta/timekeeper: HTML5 and JavaScript based timer with notification chime for academic conference
sanographix/css3-countdown: Flip style CSS3 countdown timer
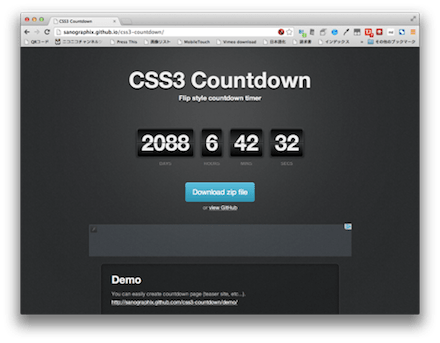
CSS3で実装されたフリップタイプのタイマーです。なお、フリップするようなアニメーションはありません。カウントダウンタイマーになるので、ティザーサイトなどで利用するのが良さそうです。
sanographix/css3-countdown: Flip style CSS3 countdown timer
いかがでしょうか。こうしたUIを実現するにはCSS3で実装したり、JavaScriptで定期的に画面を更新してあげる必要があります。また、サウンドを鳴らす仕組みはaudioクラスを利用します。こうした技術の組み合わせによってタイマーが実現できるようになっています。
とは言え仕組みはシンプルなので、HTML5の体験としてぴったりな素材ではないでしょうか。
カレンダーコンポーネントの使い方、第四弾です。今回はカレンダーの日付を選択できない状態に変更します。
実際に動いているデモはこちらにあります。
使い方
HTMLは次のようになります。ステータスを変更するためのボタンを追加しています。
This file contains hidden or bidirectional Unicode text that may be interpreted or compiled differently than what appears below. To review, open the file in an editor that reveals hidden Unicode characters.
Learn more about bidirectional Unicode characters
| <div id="container"></div> | |
| <p> | |
| <button id="disable">無効にする</button> | |
| <button id="enable">すべて有効にする</button> | |
| </p> |
JavaScriptは次のようになります。選択されている日付を取得し、それを setSelectable に渡しています。
This file contains hidden or bidirectional Unicode text that may be interpreted or compiled differently than what appears below. To review, open the file in an editor that reveals hidden Unicode characters.
Learn more about bidirectional Unicode characters
| '#disable click': function(context, $el) { | |
| var dates = this.calendarController.getSelectedDate(); | |
| disableDates = disableDates.concat(dates); | |
| this.calendarController.setSelectable(dates, false); | |
| }, |
解除する場合には、予め無効にした日付を変数に入れておき、それを setSelectable(dates, true) とすればOKです。
This file contains hidden or bidirectional Unicode text that may be interpreted or compiled differently than what appears below. To review, open the file in an editor that reveals hidden Unicode characters.
Learn more about bidirectional Unicode characters
| '#enable click': function(context, $el) { | |
| this.calendarController.setSelectable(disableDates, true); | |
| disableDates = []; | |
| } |
予約の埋まった日付をサーバから取得したり、動的に変更したい場合に便利です。お店のお休みであったり、営業外の日を設定するなど様々な使い方が考えられるでしょう。
データの一覧表示はWebシステムの基本と言えます。そうした機能を作ると、どんどん要望が上がってくるのが常です。データを並べ替えたい、件数を絞りたい、チェックボックスをつけて一括更新したいなどなどです。そうした要望にすべて応えるのはリソースがいくらあっても足りません。
そこで多機能なグリッドを実現できるライブラリをまとめて紹介します。
ceolter/ag-grid: Advanced Data Grid / Data Table supporting Javascript / React / AngularJS / Web Components
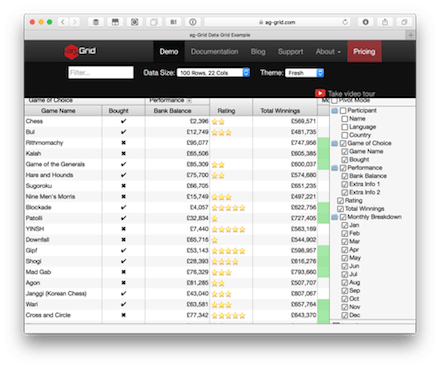
高機能なグリッドライブラリです。セルの中に画像を表示したり、レーティング表示もできます。表示項目をチェックボックスを使って絞り込んだり、ソート、カラムの入れ替えもできます。インラインでの編集もサポートされています。カラーテーマをサポートしているので自分たちのシステムに合わせたカラーリングが指定できます。
handsontable/handsontable: Handsontable Community Edition – a JavaScript/HTML5 Spreadsheet Library for Developers

大型なグリッドではなく、ページ内に埋め込める表計算といった体のライブラリです。ドロップダウンでの入力もサポートされています。行の削除やカラムの非表示指定も可能です。
Swirrl/grrid: Javascript grid control using Prototype.js

表計算風のUIを実現するライブラリです。セルの移動は矢印キーやエンターキーで行えます。表計算機能は提供されていないので注意してください。
Swirrl/grrid: Javascript grid control using Prototype.js
nnajm/orb: Pivot table javascript library

Web上でピボットテーブルが作れるライブラリです。カラムをドロップするとダイナミックに内容が変化します。さらにカラムを入れ子にでき、ドリルダウンしながら値の確認もできるようになっています。
nnajm/orb: Pivot table javascript library
rstaib/jquery-bootgrid: Nice, sleek and intuitive. A grid control especially designed for bootstrap.
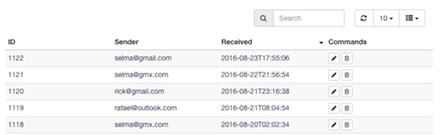
Bootstrapの標準機能として提供されているテーブルをパワーアップしてくれるライブラリです。検索、フィルタリング、ページネーション、カラムの表示/非表示切り替えといった機能が提供されています。
rstaib/jquery-bootgrid: Nice, sleek and intuitive. A grid control especially designed for bootstrap.
paulhodel/jexcel: jExcel is is a very light jquery plugin to embed a spreadsheet, compatible with Excel, in your browser. You can load data straight to a jExcel table from a JS array, json or even a CSV file. You can copy and paste from or to Excel straight to a jExcel table. For live examples, please visit:

jExcelは編集もサポートしたWeb上に埋め込める表計算ライブラリです。入力フォーマットを指定したり、カレンダーを使った入力もサポートしています。データはCSVやJSONで出力できるようになっています。
mindmup/editable-table: tiny jQuery/Bootstrap widget that makes a HTML table editable
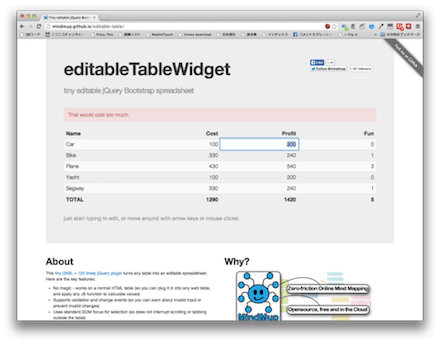
Editable TableもBootstrapのテーブルを強化します。機能としてはインラインでの編集機能を追加しますが、フッターなどの数字を編集に合わせてリアルタイムにアップデートしてくれます。
mindmup/editable-table: tiny jQuery/Bootstrap widget that makes a HTML table editable
いかがでしょうか。Bootstrapのテーブルを強化してくれるライブラリは手軽に使い始められそうです。それ以上の要望になってきたら、専用のライブラリに切り替えるのも良いでしょう。多くの要望はライブラリによって解決できるはずです。
これらのライブラリはWebブラウザ側だけで行っているのが特徴です。実際のデータ更新処理などは自分たちで実装する必要がありますので注意してください。
