PWAのCACHE APIにおいて問題になりがちなのが、キャッシュが更新されないということです。基本的にプログラム側から削除や更新しない限り、キャッシュは恒久的に残り続けます。
Googleが開発するWorkboxを使えば、キャッシュに有効期限を設けられます。そうすれば一定時間経過すれば自動的にキャッシュがなくなってコンテンツがリフレッシュされます。
有効期限の付け方
有効期限を設ける時には、キャッシュ作成時に workbox.expiration.Plugin を指定します。
This file contains hidden or bidirectional Unicode text that may be interpreted or compiled differently than what appears below. To review, open the file in an editor that reveals hidden Unicode characters.
Learn more about bidirectional Unicode characters
| workbox.routing.registerRoute(/\.(?:png|gif|jpg|jpeg|svg)$/, | |
| workbox.strategies.cacheFirst({ | |
| cacheName: 'images', | |
| plugins: [ | |
| new workbox.expiration.Plugin({ | |
| maxEntries: 60, | |
| maxAgeSeconds: 30 * 24 * 60 * 60, // 30 Days | |
| }), | |
| ], | |
| }), | |
| ); |
これを見て分かる通り、キャッシュ名を指定して作成するので、有効期限はキャッシュ名単位になります。一般的にはキャッシュ名を一つで運用してしまいがちですが、リソースの種類によって有効期限を変えるのは面白そうです。
キャッシュコントロールの難しさがPWAの導入を遅らせているとも言えます。Workboxを使って、キャッシュを適切にコントロールしてください。
Googleが提供するWorkboxはService Workerを使う上で必須とも言える機能を提供してくれます。特にキャッシュ周りの面倒な操作を手軽に行ってくれるのが利点です。
今回はそんなWorkboxでキャッシュを作成する方法を紹介します。
インストール
Workboxのインストールはローカルにファイルを設置することもできますが、importScriptsでリモートファイルを指定するのが最も簡単です。
This file contains hidden or bidirectional Unicode text that may be interpreted or compiled differently than what appears below. To review, open the file in an editor that reveals hidden Unicode characters.
Learn more about bidirectional Unicode characters
| importScripts('https://storage.googleapis.com/workbox-cdn/releases/3.6.1/workbox-sw.js'); |
これで workbox というグローバル変数が定義されます。
パターンで登録する
一般的にキャッシュを作成する場合、URL単位で指定します。しかしWorkboxの場合は正規表現パターンで指定できます。
This file contains hidden or bidirectional Unicode text that may be interpreted or compiled differently than what appears below. To review, open the file in an editor that reveals hidden Unicode characters.
Learn more about bidirectional Unicode characters
| workbox.routing.registerRoute( | |
| new RegExp('.*\.js'), | |
| workbox.strategies.cacheFirst() | |
| ); |
このように定義することで、 *.js のリクエストに対してはキャッシュファーストで返してくれるようになります。他にも workbox.strategies.networkFirst() や workbox.strategies.staleWhileRevalidate() も用意されています。
キャッシュを正規表現で指定することで、多数のファイルをまとめてキャッシュ化できます。特定ファイルはキャッシュしないというポリシーであっても、正規表現で指定すれば問題ありません。WorkboxはService Worker利用時には欠かせないツールと言えます。ぜひ使いこなしてください!
PWAではService WorkerのCACHE APIを使ってファイルをキャッシュできます。それを使えばオフライン時にもリソース(画像やJavaScriptファイルなど)を返せるので、ネットワークに繋がっていなくともWebアプリケーションが使い続けられます。
PWAを開発している際に、ファイルがキャッシュされているか、さらにキャッシュされてしまったファイルを簡単に削除する方法を紹介します。
キャッシュファイルの確認
Google Chromeを使っている場合、開発者ツールのApplicationタブにあるCache Storageからキャッシュされているコンテンツであったり、キャッシュされている内容の確認もできます。
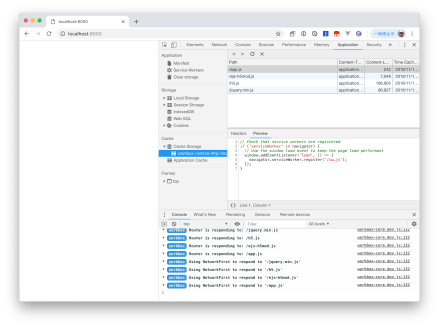
これを使えば正しくキャッシュされているかどうか、すぐに確認できます。
キャッシュの削除
キャッシュの一覧を右クリックすると、リフレッシュと削除が表示されます。プログラムでキャッシュを更新することもできますが、開発中であれば開発者ツールから行うのが簡単です。
CACHE APIは非常に強力で、キャッシュの更新や削除をしないと恒久的に残り続けてしまいます。開発中、最初から更新や削除の仕組みがある訳ではないと思いますので、開発者ツールを使う方法を覚えておくと便利です。
WebAssebmlyはWebブラウザ上でバイナリファイル(テキスト形式もあり)を実行できる環境です。JavaScriptと異なりコードの漏洩がなく、実行速度も高速というのがメリットです。
WebAssebmlyは元々Rustで開発することが多かったですが、最近では様々なプログラミング言語が対応しています。その一つがGoです。Go 1.11からWebAssembly向けにもコンパイルできるようになっています。
一般的なWebAssemblyはDOMやネットワーク操作が行えません。それに対してGo 1.11ではJavaScript APIを使えるようにした syscall/js パッケージを用いることで、DOMやネットワーク操作を可能にしています。
そこで今回はさらに面白い、ウィンドウオブジェクトやlocalStorageをWebAssemblyから使ってみます。
オンライン、オフラインを検知する
Webアプリケーションのネットワーク状態を受け取るには window オブジェクトの online または offline イベントを使います。これももちろんGoのWebAssemblyの中に記述できます。
そしてオンライン、オフラインの値は navigator.onLine で取れますので、この値も使います。
This file contains hidden or bidirectional Unicode text that may be interpreted or compiled differently than what appears below. To review, open the file in an editor that reveals hidden Unicode characters.
Learn more about bidirectional Unicode characters
| func main() { | |
| window := js.Global().Get("window") | |
| navigator := js.Global().Get("navigator") | |
| cb1 := js.NewCallback(func(args []js.Value) { | |
| if navigator.Get("onLine").Bool() { | |
| println("Network is Online"); | |
| } else { | |
| println("Network is Offline"); | |
| } | |
| }) | |
| window.Call("addEventListener", "online", cb1) | |
| window.Call("addEventListener", "offline", cb1) | |
| <-make(chan struct{}, 0) | |
| } |
これでWebAssembly側でもオンライン、オフラインの判定ができるようになります。
localStorageを使う
さらにWebブラウザとWebAssemblyでデータの送受信をする際に使ってみたいのがlocalStorageを経由したデータ授受です。
This file contains hidden or bidirectional Unicode text that may be interpreted or compiled differently than what appears below. To review, open the file in an editor that reveals hidden Unicode characters.
Learn more about bidirectional Unicode characters
| package main | |
| import "syscall/js" | |
| func main() { | |
| window := js.Global().Get("window") | |
| localStorage := window.Get("localStorage") | |
| localStorage.Set("Hello", "World") | |
| println("localStorage -> " + localStorage.Get("JavaScript").String()) | |
| } |
このようなコードで localStorage に触って、データをセットしたり、値の取得を行えます。localStorageの場合、setItemやgetItemではなくSet/Getで値の授受ができるのが特徴です。 localStorage.Call("setItem", "Hello", "World") ではうまくいきませんが、 localStorage.Get("getItem", "JavaScript") は利用できます。
syscall/js は非常によくできており、同時に利用する wasm_exec.js と組み合わせることでWebAssemblyからDOMやJavaScriptのAPIを透過的に扱えます。ちょっとした使い方さえ覚えてしまえばJavaScriptと変わらず使えるようになりそうです。
オンライン、オフライン判定などWebAssemnly単体では難しいことも容易に実現できます。ぜひGoでWebAssemblyを使ってみてください。
WebAssebmlyはWebブラウザ上でバイナリファイル(テキスト形式もあり)を実行できる環境です。JavaScriptと異なりコードの漏洩がなく、実行速度も高速というのがメリットです。
WebAssebmlyは元々Rustで開発することが多かったですが、最近では様々なプログラミング言語が対応しています。その一つがGoです。Go 1.11からWebAssembly向けにもコンパイルできるようになっています。
一般的なWebAssemblyはDOMやネットワーク操作が行えません。それに対してGo 1.11ではJavaScript APIを使えるようにした syscall/js パッケージを用いることで、DOMやネットワーク操作を可能にしています。
そこで今回はネットワーク処理(POST処理)の書き方を解説します。
使いどころ
POSTやPUT、DELETEはREST APIを扱うのに使われるでしょう。今回はPOSTリクエストでJSONを送信する方法を解説します。
ボタンを押したタイミングで処理
例えば今回はボタンを押したタイミングで入力されている内容をJSON化して送信します。そこでボタンのクリックイベントを設定します。
This file contains hidden or bidirectional Unicode text that may be interpreted or compiled differently than what appears below. To review, open the file in an editor that reveals hidden Unicode characters.
Learn more about bidirectional Unicode characters
| cb1 := js.NewCallback(func(args []js.Value) { | |
| // この中に処理を書く | |
| }) | |
| button.Call("addEventListener", "click", cb1) |
goroutineに注意
ネットワーク処理は非同期なのでデータを安全に送受信するためにgoroutineが使われています。そして単純にPOST処理を書くと、WebAssebmly全体で設定しているgoroutineが終了してデッドロックが発生してしまいました。
そこで処理全体を無名関数化して、それをgoで実行(goroutine化)します。
This file contains hidden or bidirectional Unicode text that may be interpreted or compiled differently than what appears below. To review, open the file in an editor that reveals hidden Unicode characters.
Learn more about bidirectional Unicode characters
| go func() { | |
| todo := document.Call("getElementById", "todo") | |
| var value = todo.Get("value").String() | |
| input, err := json.Marshal(Input{Todo: value}) | |
| res, err := http.Post(domain, "application/json", bytes.NewBuffer(input)) | |
| if err != nil { | |
| log.Fatal(err) | |
| } else { | |
| addTodo(document, value) | |
| } | |
| defer res.Body.Close() | |
| }() |
この問題は 1.12 で直る予定です。
CORSに注意
Goでhttp.Postを使っていますが、実際にはWebブラウザのメインスレッド側でリクエスト処理が行われます。CORSは通常のJavaScriptと変わらず行われます。また、ネットワーク接続内容などは開発者ツールで見られますので、隠蔽できる訳ではありません。
Goを使ったWebAssemblyは他の言語では見られないDOM操作とネットワークアクセスが可能です。これは大きなメリットと言えるでしょう。ぜひこの特徴を活用し、高速で安全なWebアプリケーションを開発してください。
WebAssebmlyはWebブラウザ上でバイナリファイル(テキスト形式もあり)を実行できる環境です。JavaScriptと異なりコードの漏洩がなく、実行速度も高速というのがメリットです。
WebAssebmlyは元々Rustで開発することが多かったですが、最近では様々なプログラミング言語が対応しています。その一つがGoです。Go 1.11からWebAssembly向けにもコンパイルできるようになっています。
一般的なWebAssemblyはDOMやネットワーク操作が行えません。それに対してGo 1.11ではJavaScript APIを使えるようにした syscall/js パッケージを用いることで、DOMやネットワーク操作を可能にしています。
そこで今回はネットワーク処理(GET処理)の書き方を解説します。
使いどころ
GET処理の使いどころはもちろん、Web APIからのデータ取得になるはずです。今回は文字列が配列で返ってくるケースを紹介します。
JSONを利用するためには構造体を定義する必要あり
Goの若干面倒な部分として、JSONを利用するためには構造体を定義する必要があるという点があげられます。例えば以下のような形です。
This file contains hidden or bidirectional Unicode text that may be interpreted or compiled differently than what appears below. To review, open the file in an editor that reveals hidden Unicode characters.
Learn more about bidirectional Unicode characters
| type Todos struct { | |
| Array []string | |
| } |
ネットワークは net/http で行う
Goでネットワーク処理を記述する場合には net/http ライブラリを使います。
This file contains hidden or bidirectional Unicode text that may be interpreted or compiled differently than what appears below. To review, open the file in an editor that reveals hidden Unicode characters.
Learn more about bidirectional Unicode characters
| import ( | |
| "net/http" | |
| "bytes" | |
| ) |
処理について
例えばあるドメイン domain からJSON文字列を取得するデモコードです。
This file contains hidden or bidirectional Unicode text that may be interpreted or compiled differently than what appears below. To review, open the file in an editor that reveals hidden Unicode characters.
Learn more about bidirectional Unicode characters
| func getTodos(domain string) ([]string, error) { | |
| // 構造体の定義 | |
| var todos []string | |
| // HTTPリクエスト | |
| res, err := http.Get(domain) | |
| // エラー処理 | |
| if err != nil { | |
| return todos, err | |
| } | |
| // HTTPセッションのクローズ | |
| defer res.Body.Close() | |
| // レスポンスボディの読み込み | |
| body, err := ioutil.ReadAll(res.Body) | |
| // エラー処理 | |
| if err != nil { | |
| return todos, err | |
| } | |
| // JSONを文字列の配列に変換 | |
| err = json.Unmarshal([]byte(body), &todos) | |
| // 返却 | |
| return todos, err | |
| } |
後はこの関数を実行します。
This file contains hidden or bidirectional Unicode text that may be interpreted or compiled differently than what appears below. To review, open the file in an editor that reveals hidden Unicode characters.
Learn more about bidirectional Unicode characters
| todos, err := getTodos(domain) |
これでJSONの取得とパースが完了します。なお、見ての通り、このコードはネットワーク部分を同期的に処理しています。関数の頭に go をつけることで非同期処理になりますが、描画部分を考えると同期(または描画を含めて非同期)処理にしなければなりません。
また、このネットワーク接続はWebAssemblyの中で行われているのではなく、メインスレッド側で行われます。そのため開発者ツールなどでリクエスト内容は確認できます。ネットワーク接続を秘匿にするのは困難なので、注意してください。
Onsen UIというモバイルアプリ向けのUIフレームワークがあります。HTML5とJavaScript、CSSを使ってスマートフォンアプリを作るハイブリッドアプリ用のUIフレームワークになります。UIをネイティブアプリ風にしてくれるのはもちろん、画面のスワイプであったり、リスト表示などをネイティブアプリ風の操作にしてくれます。
そんなOnsen UIをhifiveと組み合わせて使う方法を紹介します。今回はタブバーとナビゲーションを組み合わせた使い方を紹介します。
利用するソフトウェア/ライブラリ
- Bower
- hifive
- Onsen UI
- jQuery
インストール
まず各ライブラリをインストールします。インストールはBowerを使って行います。
This file contains hidden or bidirectional Unicode text that may be interpreted or compiled differently than what appears below. To review, open the file in an editor that reveals hidden Unicode characters.
Learn more about bidirectional Unicode characters
| $ bower install hifive jquery onsenui –save |
今回は .bowerrc という設定ファイルを作成し、ライブラリのインストール先を指定しています。
This file contains hidden or bidirectional Unicode text that may be interpreted or compiled differently than what appears below. To review, open the file in an editor that reveals hidden Unicode characters.
Learn more about bidirectional Unicode characters
| { | |
| "directory": "public/components" | |
| } |
index.htmlの作成
次に public/index.html を作成します。タブバーを定義します。
This file contains hidden or bidirectional Unicode text that may be interpreted or compiled differently than what appears below. To review, open the file in an editor that reveals hidden Unicode characters.
Learn more about bidirectional Unicode characters
| <!DOCTYPE html> | |
| <html> | |
| <head> | |
| <meta http-equiv="X-UA-Compatible" content="IE=edge" /> | |
| <title></title> | |
| <meta charset="utf-8" /> | |
| <meta name="description" content="" /> | |
| <meta name="author" content="" /> | |
| <meta name="viewport" content="width=device-width, initial-scale=1" /> | |
| <link rel="stylesheet" href="components/onsenui/css/onsenui.min.css" /> | |
| <link rel="stylesheet" href="components/onsenui/css/onsen-css-components.min.css" /> | |
| <!–[if lt IE 9]> | |
| <script src="//cdn.jsdelivr.net/html5shiv/3.7.2/html5shiv.min.js"></script> | |
| <script src="//cdnjs.cloudflare.com/ajax/libs/respond.js/1.4.2/respond.min.js"></script> | |
| <![endif]–> | |
| <link rel="shortcut icon" href="" /> | |
| </head> | |
| <body> | |
| <ons-page> | |
| <ons-toolbar id="toolbar"> | |
| <div class="center">メイン</div> | |
| </ons-toolbar> | |
| <ons-tabbar swipeable position="auto" id="tabbar"> | |
| <ons-tab page="tab1.html" label="Tab 1" icon="ion-home, material:md-home" badge="7" active> | |
| </ons-tab> | |
| <ons-tab page="tab2.html" label="Tab 2" icon="md-settings" active-icon="md-face"> | |
| </ons-tab> | |
| </ons-tabbar> | |
| </ons-page> | |
| <script src="components/onsenui/js/onsenui.js"></script> | |
| <script src="components/jquery/dist/jquery.min.js"></script> | |
| <script src="components/hifive/ejs-h5mod.js"></script> | |
| <script src="components/hifive/h5.dev.js"></script> | |
| <script src="js/app.js"></script> | |
| </body> | |
| </html> |
タブバーの画面
まず最初に表示される tab1.html の画面を用意します。タブ1の中身でナビゲーションを行いますので、ここではナビゲーションだけを定義します。
This file contains hidden or bidirectional Unicode text that may be interpreted or compiled differently than what appears below. To review, open the file in an editor that reveals hidden Unicode characters.
Learn more about bidirectional Unicode characters
| <ons-page id="tab1"> | |
| <ons-navigator swipeable id="tab1nav" page="tab1-main.html"></ons-navigator> | |
| </ons-page> |
そして最初に表示するのは tab1-main.html です。
This file contains hidden or bidirectional Unicode text that may be interpreted or compiled differently than what appears below. To review, open the file in an editor that reveals hidden Unicode characters.
Learn more about bidirectional Unicode characters
| <ons-page id="tab1main"> | |
| <p style="text-align: center;"> | |
| <p>ここはメインページです。</p> | |
| <p> | |
| <ons-input id="message" modifier="underbar" placeholder="メッセージ" float></ons-input> | |
| </p> | |
| <ons-button class="btn" modifier="large">詳細画面に移動</ons-button> | |
| </p> | |
| </ons-page> |
JavaScriptの実装
まずメイン画面でボタンを押したら詳細画面に移動する部分を作ります。 tab1MainController を定義します。そしてナビゲーションのpushPageを使って画面遷移します。
ここでヘッダー部の文字を詳細に変えるようにイベントを設定します。コントローラのトリガーを使います。
This file contains hidden or bidirectional Unicode text that may be interpreted or compiled differently than what appears below. To review, open the file in an editor that reveals hidden Unicode characters.
Learn more about bidirectional Unicode characters
| <ons-page id="tab1main"> | |
| <p style="text-align: center;"> | |
| <p>ここはメインページです。</p> | |
| <p> | |
| <ons-input id="message" modifier="underbar" placeholder="メッセージ" float></ons-input> | |
| </p> | |
| <ons-button class="btn" modifier="large">詳細画面に移動</ons-button> | |
| </p> | |
| <script> | |
| ons.getScriptPage().onInit = function() { | |
| const tab1MainController = { | |
| __name: 'Tab1MainController', | |
| '.btn click'() { | |
| this.trigger('changeTitle', { | |
| back: true, | |
| title: '詳細' | |
| }); | |
| $('#tab1nav')[0].pushPage('tab1-detail.html', { | |
| message: this.$find('#message').val() | |
| }); | |
| } | |
| }; | |
| h5.core.controller('#tab1main', tab1MainController); | |
| } | |
| </script> | |
| </ons-page> |
トリガーは js/app.js 内に定義する全体のコントローラに実装します。 {rootElement} changeTitle でイベントを受け取ることができます。
This file contains hidden or bidirectional Unicode text that may be interpreted or compiled differently than what appears below. To review, open the file in an editor that reveals hidden Unicode characters.
Learn more about bidirectional Unicode characters
| const appController = { | |
| __name: 'AppController', | |
| _tab1Controller: Tab1Controller, | |
| _tab2Controller: Tab2Controller, | |
| __ready() { | |
| }, | |
| '{rootElement} changeTitle'(context) { | |
| let back = ''; | |
| if (context.evArg.back) { | |
| back = `<div class="left"> | |
| <ons-back-button id="backButton">Back</ons-back-button> | |
| </div>`; | |
| } | |
| const outerHTML = ons.createElement(` | |
| <ons-toolbar id="toolbar"> | |
| ${back} | |
| <div class="center">${context.evArg.title}</div> | |
| </ons-toolbar> | |
| `); | |
| this.$find('#toolbar').prop('outerHTML', outerHTML.outerHTML); | |
| }, | |
| '#tabbar prechange'() { | |
| this.trigger('changeTitle', { | |
| title: "メイン", | |
| back: false | |
| }); | |
| } | |
| }; | |
| h5.core.controller('body', appController); |
なお、 Tab1Controller と Tab2Controller は別な画面に定義されています。そのため、変数が定義されているかどうかを確認する必要があります。今回は以下のような仕組みで回避しています。変数があるかどうか調べて、なければ100ms待って変数の確認をしています。
This file contains hidden or bidirectional Unicode text that may be interpreted or compiled differently than what appears below. To review, open the file in an editor that reveals hidden Unicode characters.
Learn more about bidirectional Unicode characters
| ons.ready(() => { | |
| resolveVariable(['Tab1Controller', 'Tab2Controller']) | |
| .then(() => { | |
| // 変数定義済み | |
| }); | |
| }); | |
| const resolveVariable = (ary) => { | |
| return new Promise((res, rej) => { | |
| setTimeout(() => { | |
| let bol = true; | |
| for (let index in ary) { | |
| if (!(ary[index] in window)) { | |
| bol = false; | |
| return resolveVariable(ary) | |
| } | |
| } | |
| if (bol) res(); | |
| }, 100); | |
| }) | |
| } |
画面遷移を戻る
詳細画面に移動したら、逆に戻ってくる処理を作ります。これは tab1-detail.html に実装します。こちらでもトリガーを使っています。
This file contains hidden or bidirectional Unicode text that may be interpreted or compiled differently than what appears below. To review, open the file in an editor that reveals hidden Unicode characters.
Learn more about bidirectional Unicode characters
| <ons-page id="tab1detail"> | |
| <p style="text-align: center;"> | |
| こちらは詳細画面です | |
| <ons-button class="btn" modifier="large">戻る</ons-button> | |
| </p> | |
| <script> | |
| ons.getScriptPage().onInit = function() { | |
| const tab1DetailController = { | |
| __name: 'Tab1DetailController', | |
| '.btn click'() { | |
| this.trigger('changeTitle', { | |
| back: false, | |
| title: 'メイン' | |
| }); | |
| $('#tab1nav')[0].popPage(); | |
| } | |
| }; | |
| h5.core.controller('#tab1detail', tab1DetailController); | |
| } | |
| </script> | |
| </ons-page> |
ここまでの処理でタブバーとナビゲーションバーを組み合わせた処理が実現します。
タブバーとナビゲーションバーを組み合わせた動きはスマートフォンアプリでよくある実装だと思います。hifiveのコントローラ連携を使うことで、機能を画面毎に分けつつ、分かりやすい実装が実現します。
コードはhifiveWithOnsenUI/tabbar_navigation at master · hifivemania/hifiveWithOnsenUIにアップロードされています。実装時の参考にしてください。
jQueryはIDやクラスを指定してDOMエレメントが取得できるので便利に使っている人は多いかと思います。しかし、DOMの取得だけであれば素のJavaScriptでも簡単にできます。それがdocument.querySelectorです。
他にもIDを指定する document.getElementById 、クラスを指定する document.getElementsByClassName 、タグ名を指定する document.getElementsByTagName など何種類もあるのが分かりづらさを感じさせる原因ですが、document.querySelector と document.querySelectorAll はすべてを兼ね備えます。
ということで今回は document.querySelector / document.querySelectorAll の使い方を紹介します。
document.querySelector と document.querySelectorAll の違い
二つのメソッドの違いは返ってくるのが複数かどうかです。 document.querySelector は最初の一つしか返ってきません。クラスやリストを指定しても最初の一つだけです。それに対して document.querySelectorAll は一致するDOMすべてが返ってきます。
document.querySelectorの使い方
document.querySelector は引数にCSSセレクタを指定します。これはjQueryで使ってきたものをそのまま使えます。
This file contains hidden or bidirectional Unicode text that may be interpreted or compiled differently than what appears below. To review, open the file in an editor that reveals hidden Unicode characters.
Learn more about bidirectional Unicode characters
| document.querySelector('.hoge') |
返ってくるのはDOMです。
ない時には nullが返ってくる
注意点としては該当するDOMがなかった場合には null が返ってくるので、メソッドチェーンが使えません。それに対してjQueryの場合はメソッドチェーンが可能です。
This file contains hidden or bidirectional Unicode text that may be interpreted or compiled differently than what appears below. To review, open the file in an editor that reveals hidden Unicode characters.
Learn more about bidirectional Unicode characters
| document.querySelector('.hoge').innerText // エラー | |
| $('.hoge').text() // 空文字 |
これをいちいち判定しながら作るのはちょっと面倒でしょう。
簡単な関数でラップする
そこで document.querySelector を直接使わず、簡単な関数でラップしてあげます。
This file contains hidden or bidirectional Unicode text that may be interpreted or compiled differently than what appears below. To review, open the file in an editor that reveals hidden Unicode characters.
Learn more about bidirectional Unicode characters
| function $(selector, doc) { | |
| let dom = null; | |
| let target = doc || document; | |
| const plural = !(selector.match(/^.*#[a-zA-Z0-9\-_\.]+$/)); | |
| if (plural) { | |
| dom = target.querySelectorAll(selector); | |
| } else { | |
| dom = target.querySelector(selector); | |
| } | |
| if (plural) { | |
| if (dom.length > 0) return dom; | |
| } else { | |
| if (dom) return dom; | |
| } | |
| dom = document.createElement('div') | |
| dom.$ = function(selector) { | |
| return $(selector, dom) | |
| }; | |
| return plural ? [dom] : dom; | |
| } |
これはごくごく簡単な例ですが、存在しないCSSセレクタを指定してもある程度のメソッドチェーンが書けるようになります。
document.querySelectorやdocument.querySelectorAll、そしてそれがエラーを起こさないためのやり方さえ覚えてしまえばjQueryを使うことなくDOM操作を行えるようになります。jQueryは他にもたくさんの機能があって便利ですがAngularやReact、Vueとの相性が良くなかったり、使っていない機能の方が多くなりがちです。jQueryで使っているのがDOM操作ばかりだ…という方はdocument.querySelectorに乗り換えても良いでしょう。
WebAssebmlyはWebブラウザ上でバイナリファイル(テキスト形式もあり)を実行できる環境です。JavaScriptと異なりコードの漏洩がなく、実行速度も高速というのがメリットです。
WebAssebmlyは元々Rustで開発することが多かったですが、最近では様々なプログラミング言語が対応しています。その一つがGoです。Go 1.11からWebAssembly向けにもコンパイルできるようになっています。
一般的なWebAssemblyはDOMやネットワーク操作が行えません。それに対してGo 1.11ではJavaScript APIを使えるようにした syscall/js パッケージを用いることで、DOMやネットワーク操作を可能にしています。
そこで今回はDOMのクリックイベントをWebAssemblyで扱う方法を紹介します。
まずGoのコードです。今回はmain.goとしています。最初に syscall/js をインポートします。
This file contains hidden or bidirectional Unicode text that may be interpreted or compiled differently than what appears below. To review, open the file in an editor that reveals hidden Unicode characters.
Learn more about bidirectional Unicode characters
| import "syscall/js" |
そして、トップレベルのDOMであるドキュメントを作成します。
This file contains hidden or bidirectional Unicode text that may be interpreted or compiled differently than what appears below. To review, open the file in an editor that reveals hidden Unicode characters.
Learn more about bidirectional Unicode characters
| document := js.Global().Get("document") |
IDやクラスを使ってDOMを取得します。
This file contains hidden or bidirectional Unicode text that may be interpreted or compiled differently than what appears below. To review, open the file in an editor that reveals hidden Unicode characters.
Learn more about bidirectional Unicode characters
| button := document.Call("getElementById", "btn") |
取得したボタンに対してコールバックを指定します。
This file contains hidden or bidirectional Unicode text that may be interpreted or compiled differently than what appears below. To review, open the file in an editor that reveals hidden Unicode characters.
Learn more about bidirectional Unicode characters
| cb := js.NewCallback(func(args []js.Value) { | |
| println("Clicked"); | |
| }) |
ボタンのクリックイベントにコールバックを指定します。
This file contains hidden or bidirectional Unicode text that may be interpreted or compiled differently than what appears below. To review, open the file in an editor that reveals hidden Unicode characters.
Learn more about bidirectional Unicode characters
| button.Call("addEventListener", "click", cb) |
最後にプログラムが終了しないようにチャネルを待ち受けます。
This file contains hidden or bidirectional Unicode text that may be interpreted or compiled differently than what appears below. To review, open the file in an editor that reveals hidden Unicode characters.
Learn more about bidirectional Unicode characters
| <-make(chan struct{}, 0) |
これで完成です。全体のコードは次のようになります。
This file contains hidden or bidirectional Unicode text that may be interpreted or compiled differently than what appears below. To review, open the file in an editor that reveals hidden Unicode characters.
Learn more about bidirectional Unicode characters
| package main | |
| import "syscall/js" | |
| func main() { | |
| document := js.Global().Get("document") | |
| button := document.Call("getElementById", "btn") | |
| cb1 := js.NewCallback(func(args []js.Value) { | |
| println("Clicked"); | |
| }) | |
| button.Call("addEventListener", "click", cb1) | |
| <-make(chan struct{}, 0) | |
| } |
HTMLを準備する
HTMLはボタンを貼り付けだけのものです。
This file contains hidden or bidirectional Unicode text that may be interpreted or compiled differently than what appears below. To review, open the file in an editor that reveals hidden Unicode characters.
Learn more about bidirectional Unicode characters
| <html> | |
| <head> | |
| <meta charset="utf-8"> | |
| <script src="wasm_exec.js"></script> | |
| <script> | |
| const go = new Go(); | |
| WebAssembly.instantiateStreaming(fetch("main.wasm"), go.importObject).then((result) => { | |
| go.run(result.instance); | |
| }); | |
| </script> | |
| </head> | |
| <body> | |
| <button id="btn">クリック</button> | |
| </body> | |
| </html> |
JavaScriptファイルを用意する
専用のJavaScriptファイルを設置します。
This file contains hidden or bidirectional Unicode text that may be interpreted or compiled differently than what appears below. To review, open the file in an editor that reveals hidden Unicode characters.
Learn more about bidirectional Unicode characters
| $ cp "$(go env GOROOT)/misc/wasm/wasm_exec.js" . |
Goをコンパイルする
最後にGoファイルをコンパイルして WebAssebmly化します。
This file contains hidden or bidirectional Unicode text that may be interpreted or compiled differently than what appears below. To review, open the file in an editor that reveals hidden Unicode characters.
Learn more about bidirectional Unicode characters
| $ GOOS=js GOARCH=wasm go build -o main.wasm |
サーバを立ち上げる
Webサーバは goexec を用います。インストールは go get -u github.com/shurcooL/goexec になります。インストールされたら以下のコマンドでHTTPサーバを立ち上げます。
This file contains hidden or bidirectional Unicode text that may be interpreted or compiled differently than what appears below. To review, open the file in an editor that reveals hidden Unicode characters.
Learn more about bidirectional Unicode characters
| $ goexec 'http.ListenAndServe(":8080", http.FileServer(http.Dir(".")))' |
これで http://localhost:8080/ でアクセスできます。
試す
では実際に試しているところです。ボタンをクリックすると開発者ツールのコンソールにログが出力されます。

このようにしてGoのコードからイベントハンドリングができます。
Goを使うことでWebアプリケーションをまるっとWebAssemblyで提供できる可能性が出てきました。高速、かつコードの隠蔽化も実現しますのでWebアプリケーションの可能性を飛躍的に向上できるでしょう。
ぜひトライしてみてください。
WebAssebmlyはWebブラウザ上でバイナリファイル(テキスト形式もあり)を実行できる環境です。JavaScriptと異なりコードの漏洩がなく、実行速度も高速というのがメリットです。
WebAssebmlyは元々Rustで開発することが多かったですが、最近では様々なプログラミング言語が対応しています。その一つがGoです。Go 1.11からWebAssembly向けにもコンパイルできるようになっています。
この記事ではWebAssembly · golang/go Wikiに沿ってGoでWebAssemblyを実行するまでを紹介します。
環境
WebAssebmlyはモダンなWebブラウザが対応していますが、Goが提供するJavaScriptコードがSafariでは動きませんでした。以下はGoogle Chromeで試しています。
Goのコード
今回はとてもシンプルなコードです。 main.go として作成します。
This file contains hidden or bidirectional Unicode text that may be interpreted or compiled differently than what appears below. To review, open the file in an editor that reveals hidden Unicode characters.
Learn more about bidirectional Unicode characters
| package main | |
| import "fmt" | |
| func main() { | |
| fmt.Println("Hello, WebAssembly!") | |
| } |
このコードをGoでコンパイルします。
This file contains hidden or bidirectional Unicode text that may be interpreted or compiled differently than what appears below. To review, open the file in an editor that reveals hidden Unicode characters.
Learn more about bidirectional Unicode characters
| $ GOOS=js GOARCH=wasm go build -o main.wasm |
これで main.wasm というファイルが作成されます。
HTMLについて
HTMLはテンプレートになっており、以下を使います。
This file contains hidden or bidirectional Unicode text that may be interpreted or compiled differently than what appears below. To review, open the file in an editor that reveals hidden Unicode characters.
Learn more about bidirectional Unicode characters
| <html> | |
| <head> | |
| <meta charset="utf-8"> | |
| <script src="wasm_exec.js"></script> | |
| <script> | |
| const go = new Go(); | |
| WebAssembly.instaantiateStreaming(fetch("main.wasm"), go.importObject).then((result) => { | |
| go.run(result.instance); | |
| }); | |
| </script> | |
| </head> | |
| <body></body> | |
| </html> |
JavaScriptについて
WebAssebmlyを解釈するのにGoが提供しているJavaScriptライブラリを使います。
This file contains hidden or bidirectional Unicode text that may be interpreted or compiled differently than what appears below. To review, open the file in an editor that reveals hidden Unicode characters.
Learn more about bidirectional Unicode characters
| $ cp "$(go env GOROOT)/misc/wasm/wasm_exec.js" . |
この3つのファイルで実行します。
goexecのインストール
HTTPサーバを立てる必要があるので、goexecをインストールします。
This file contains hidden or bidirectional Unicode text that may be interpreted or compiled differently than what appears below. To review, open the file in an editor that reveals hidden Unicode characters.
Learn more about bidirectional Unicode characters
| $ go get -u github.com/shurcooL/goexec |
これで準備完了です。
実行する
HTTPサーバを立てます。
This file contains hidden or bidirectional Unicode text that may be interpreted or compiled differently than what appears below. To review, open the file in an editor that reveals hidden Unicode characters.
Learn more about bidirectional Unicode characters
| $ goexec 'http.ListenAndServe(":8080", http.FileServer(http.Dir(".")))' |
http://localhost:8080/ でHTTPサーバが立ち上がるので、Google Chromeからアクセスします。
開発者ツールのコンソールに Hello, WebAssembly! と出力されれば完成です。

GoでWebAssemblyを書く場合、特別なテクニックが必要という訳ではありません。普段のGoの書き方で、コンパイル方法を指定するだけです。Goであれば、よりモダンな書き方でWebAssemblyが使えるようになりますのでお勧めです。
