hifiveのチャートライブラリの使い方を紹介します。今回はグラフの拡大表示、縮小表示の仕方です。
ベースはチャートライブラリの使い方(1)「基本編」 | hifive開発者ブログのグラフになります。
実行しているところは下記の通りです。こちらのURLにてサンプルを試せます。
幅と高さをコントローラの変数へ移行
チャートの幅と高さを動的に変更するので、設定をコントローラの変数にします。これによりイベントから操作しやすくなります。
This file contains hidden or bidirectional Unicode text that may be interpreted or compiled differently than what appears below. To review, open the file in an editor that reveals hidden Unicode characters.
Learn more about bidirectional Unicode characters
| var pageController = { | |
| __name: 'ui.chart.pageController', | |
| : | |
| _width: 600, // 追加 | |
| _height: 480, // 追加 | |
| __ready: function(context) { | |
| : | |
| this._chartController.draw({ | |
| chartSetting: { | |
| width: this._width, // 変更 | |
| height: this._height // 変更 | |
| }, |
HTMLを修正
HTMLを次のように修正します。拡大、および縮小ボタンを追加します。
This file contains hidden or bidirectional Unicode text that may be interpreted or compiled differently than what appears below. To review, open the file in an editor that reveals hidden Unicode characters.
Learn more about bidirectional Unicode characters
| <div id="chart" ></div> | |
| <p> | |
| <button id="expand"> | |
| 拡大 | |
| </button> | |
| <button id="shrink"> | |
| 縮小 | |
| </button> | |
| </p> |
ボタンを押した時のイベントを追加
ボタンを押した時のイベントを設定します。それぞれチャートコントローラの setChartSetting を実行します。拡大(#expand)の場合はサイズを2倍に、縮小(#shrink)の場合は1/2にして大きさを適用します。
This file contains hidden or bidirectional Unicode text that may be interpreted or compiled differently than what appears below. To review, open the file in an editor that reveals hidden Unicode characters.
Learn more about bidirectional Unicode characters
| "#expand click": function() { | |
| this._setChartSetting(this._width *= 2, this._height *= 2); | |
| }, | |
| "#shrink click": function() { | |
| this._setChartSetting(this._width /= 2, this._height /= 2); | |
| }, | |
| _setChartSetting: function(width, height) { | |
| this._chartController.setChartSetting({ | |
| width: width, | |
| height: height | |
| }); | |
| }, |
これらの変更によってチャートの拡大/縮小が可能になります。大量のデータがある時に拡大して細かく分析したり、逆に縮小することでトレンドが分かりやすくなります。hifiveのチャートライブラリを使って、分かりやすいグラフを提供してください。
![]()
今回はWebのUIで見かけることが多くなってきたドラッグ&ドロップを実装する方法を紹介します。hifiveではなく、jQuery UIと組み合わせた方法になります。
実際に動くデモはこちらになります。
必要なライブラリ
ドラッグ&ドロップを行う際には次のライブラリを利用します。
HTML
HTMLは次のようになります。idをドラッグできるDOM、されるDOMにそれぞれ設定しておきます。
This file contains hidden or bidirectional Unicode text that may be interpreted or compiled differently than what appears below. To review, open the file in an editor that reveals hidden Unicode characters.
Learn more about bidirectional Unicode characters
| <div id="container"> | |
| <div id="draggable" class="ui-widget-content"> | |
| <p>Drag me to my target</p> | |
| </div> | |
| <div id="droppable" class="ui-widget-header"> | |
| <p>Drop here</p> | |
| </div> | |
| </div> |
JavaScript
hifiveのコントローラの基本形は次のようになります。
This file contains hidden or bidirectional Unicode text that may be interpreted or compiled differently than what appears below. To review, open the file in an editor that reveals hidden Unicode characters.
Learn more about bidirectional Unicode characters
| var controller = { | |
| __name: 'Drag&DropController', | |
| // 初期化処理 | |
| __ready: function() { | |
| }, | |
| // 要素がドロップされた時のコールバック | |
| drop: function(org, event, ui) { | |
| } | |
| }; | |
| // コントローラの作成と要素へのバインド. | |
| h5.core.controller('#container', controller); |
まず初期化処理を行います。
This file contains hidden or bidirectional Unicode text that may be interpreted or compiled differently than what appears below. To review, open the file in an editor that reveals hidden Unicode characters.
Learn more about bidirectional Unicode characters
| // 初期化処理 | |
| __ready: function() { | |
| var that = this; | |
| $('#draggable').draggable(); | |
| $('#droppable').droppable({ | |
| drop: that.ownWithOrg(that.drop) | |
| }); | |
| }, |
このように記述することでドラッグできるDOMが作られ、マウスでドラッグできます。droppableはドロップできるDOMで、dropされた時にコールバック処理を呼び出します。
最後にドロップされた時のコールバックを記述します。
This file contains hidden or bidirectional Unicode text that may be interpreted or compiled differently than what appears below. To review, open the file in an editor that reveals hidden Unicode characters.
Learn more about bidirectional Unicode characters
| // 要素がドロップされた時のコールバック | |
| drop: function(org, event, ui) { | |
| $(org).addClass('ui-state-highlight').find('p').html('Dropped!'); | |
| } |
CSS
CSSは次のように記述しました。これはデザインに応じて変更してください。
This file contains hidden or bidirectional Unicode text that may be interpreted or compiled differently than what appears below. To review, open the file in an editor that reveals hidden Unicode characters.
Learn more about bidirectional Unicode characters
| #draggable { | |
| width: 100px; | |
| height: 100px; | |
| padding: 0.5em; | |
| float: left; | |
| margin: 10px 10px 10px 0; | |
| } | |
| #droppable { | |
| width: 150px; | |
| height: 150px; | |
| padding: 0.5em; | |
| float: left; | |
| margin: 10px; | |
| } |
これで完成です。
jQueryの記述に従っていますが、hifiveの中でコントロールできます。UIを自由に設定させたり、データを移動したりするような処理を作る際に使ってください。
今回のサンプルはこちらにあります。コードを確認する際に利用してください。
![]()
JavaScriptを使っていて常に悩みのタネなのが変数の型付けです。スクリプト言語に慣れた方であれば気にならないかも知れませんが、サーバサイドやアプリ開発でコンパイルするのに慣れているプログラマーにとっては書いていて不安に感じる点もあるでしょう。
そこで今回はJavaScriptの代替言語の中でも静的型付けをサポートするものを紹介します。
Haxe

HaxeはJavaScriptだけでなくJava、C++、PHP、C#、Python、ActionScript3などに変換できます。例えば次のようなコードになります。
This file contains hidden or bidirectional Unicode text that may be interpreted or compiled differently than what appears below. To review, open the file in an editor that reveals hidden Unicode characters.
Learn more about bidirectional Unicode characters
| @:generic | |
| class MyValue<T> { | |
| public var value:T; | |
| public function new(value:T) { | |
| this.value = value; | |
| } | |
| } | |
| class Main { | |
| static public function main() { | |
| var a = new MyValue<String>("Hello"); | |
| var b = new MyValue<Int>(42); | |
| } | |
| } |
開発対象としてはiOS/Androidを含め、サーバサイドまで幅広く対応します。
Home – Haxe – The Cross-platform Toolkit
elm
elmで書く場合、HTML/JavaScript/CSSを直接書くことはできません。すべてelm上で提供されるので、Webアプリケーション全体の記述ができます。ベースになっているのはHaskellで強力な静的型付けが特徴になっています。
コード例ですが、これで表示まで含めてサポートされます。
This file contains hidden or bidirectional Unicode text that may be interpreted or compiled differently than what appears below. To review, open the file in an editor that reveals hidden Unicode characters.
Learn more about bidirectional Unicode characters
| — Read more about this program in the official Elm guide: | |
| — https://guide.elm-lang.org/architecture/user_input/buttons.html | |
| import Html exposing (beginnerProgram, div, button, text) | |
| import Html.Events exposing (onClick) | |
| main = | |
| beginnerProgram { model = 0, view = view, update = update } | |
| view model = | |
| div [] | |
| [ button [ onClick Decrement ] [ text "-" ] | |
| , div [] [ text (toString model) ] | |
| , button [ onClick Increment ] [ text "+" ] | |
| ] | |
| type Msg = Increment | Decrement | |
| update msg model = | |
| case msg of | |
| Increment -> | |
| model + 1 | |
| Decrement -> | |
| model – 1 |
Kotlin

主にAndroidアプリを開発するのに用いられるKotlinですが、JavaScriptとして変換もできます。Androidで動作するレベルでの静的型付けがWeb上でも可能となっています。
This file contains hidden or bidirectional Unicode text that may be interpreted or compiled differently than what appears below. To review, open the file in an editor that reveals hidden Unicode characters.
Learn more about bidirectional Unicode characters
| /** | |
| * A reference must be explicitly marked as nullable to be able hold a null. | |
| * See http://kotlinlang.org/docs/reference/null-safety.html#null-safety | |
| */ | |
| package multiplier | |
| // Return null if str does not hold a number | |
| fun parseInt(str: String): Int? { | |
| try { | |
| return str.toInt() | |
| } catch (e: NumberFormatException) { | |
| println("One of the arguments isn't Int") | |
| } | |
| return null | |
| } | |
| fun main(args: Array<String>) { | |
| if (args.size < 2) { | |
| println("No number supplied"); | |
| } else { | |
| val x = parseInt(args[0]) | |
| val y = parseInt(args[1]) | |
| // We cannot say 'x * y' now because they may hold nulls | |
| if (x != null && y != null) { | |
| print(x * y) // Now we can | |
| } else { | |
| println("One of the arguments is null") | |
| } | |
| } | |
| } |
Kotlinの開発元はJetBrainsとなっています。
RapydScript

RapydScriptはPythonにインスパイアされたaltJSになります。型を定義せずに記述もできますが、定義することで間違った使い方をした際にエラーを起こすこともできます。
This file contains hidden or bidirectional Unicode text that may be interpreted or compiled differently than what appears below. To review, open the file in an editor that reveals hidden Unicode characters.
Learn more about bidirectional Unicode characters
| def optimizeMe(a: Number, b:Number) -> Number: |
Pythonの書き方に慣れた方はCoffeeScriptよりも手軽に使えるかも知れません。
RapydScript | Pythonic JavaScript that doesn't suck
Flow

既存のコードに対して型定義を行い、ビルド時に除去することによって既存のコードに影響を与えずに型付け機能だけを追加できます。
This file contains hidden or bidirectional Unicode text that may be interpreted or compiled differently than what appears below. To review, open the file in an editor that reveals hidden Unicode characters.
Learn more about bidirectional Unicode characters
| // @flow | |
| function square(n: number): number { | |
| return n * n; | |
| } | |
| square("2", "2"); // Error! |
開発する言語自体は変えずに追加できるのが便利です。
Flow: A Static Type Checker for JavaScript
TypeScript

Microsoftが開発し、Googleの社内標準言語にも取り入れられたaltJSです。Visual Studio Codeとの親和性も高く、入力補完機能なども便利に使えます。より大規模な開発に向いています。
This file contains hidden or bidirectional Unicode text that may be interpreted or compiled differently than what appears below. To review, open the file in an editor that reveals hidden Unicode characters.
Learn more about bidirectional Unicode characters
| class Greeter { | |
| constructor(public greeting: string) { } | |
| greet() { | |
| return "<h1>" + this.greeting + "</h1>"; | |
| } | |
| }; | |
| var greeter = new Greeter("Hello, world!"); | |
| document.body.innerHTML = greeter.greet(); |
ECMAScript2017の先進的な機能も取り込まれているので、より新しいJavaScriptの機能を使っていきたいという方にもぴったりです。
TypeScript – JavaScript that scales.
業務システムであったり、エンタープライズ寄りになればなるほど、開発規模が大きくなって参加するプログラマも多くなります。そうした中ではスクリプト言語の変数の型が決まっていない開発は混乱をきたすこともあります。
今回紹介したような言語を使ってWebシステム開発を効率化してください。
![]()
hifiveのチャートライブラリの紹介です。今回は動的に系列データを追加する方法を紹介します。
現在、動的な系列データの追加は積み上げグラフの場合のみサポートされています。実際の動作は下の画像のようになります。
サンプルはこちらのURL にて確認できます。ベースはチャートライブラリの使い方(1)「基本編」 | hifive開発者ブログのグラフです。
ボタンを追加
まずHTMLにボタンを追加します。
This file contains hidden or bidirectional Unicode text that may be interpreted or compiled differently than what appears below. To review, open the file in an editor that reveals hidden Unicode characters.
Learn more about bidirectional Unicode characters
| <p> | |
| <button id="add"> | |
| データ系列追加 | |
| </button> | |
| </p> |
追加イベントを作成
追加時の処理ですが、これはシリーズデータを作成(配列)し、チャートコントローラの addSeries を実行します。配列であることに注意してください。
This file contains hidden or bidirectional Unicode text that may be interpreted or compiled differently than what appears below. To review, open the file in an editor that reveals hidden Unicode characters.
Learn more about bidirectional Unicode characters
| this._chartController.addSeries([this._createNewSeries()]); |
色の生成処理を追加
これはおまけですが、グラフの系列データの色をランダムで生成するようにしました。ランダムなカラーコードを生成 – Qiitaを参考にさせてもらいました。
This file contains hidden or bidirectional Unicode text that may be interpreted or compiled differently than what appears below. To review, open the file in an editor that reveals hidden Unicode characters.
Learn more about bidirectional Unicode characters
| _createNewSeries: function() { | |
| var data = createChartDummyData(400, 100); // ダミーデータを生成 | |
| // 系列定義 | |
| var color = GenerateColor(); | |
| return { | |
| name: 'series_'+color, | |
| type: 'stacked_line', | |
| data: data, | |
| propNames: { | |
| y: 'val' | |
| }, | |
| fillColor: "#" + GenerateColor(), | |
| color: "#" + color | |
| }; | |
| } | |
| function GenerateColor() { | |
| return Math.floor(Math.random()*16777215).toString(16); | |
| } |
色コードを系列データの名前に適用しています。また、fillColor(塗りつぶしの色)に対しても別なランダムな色を適用しています。塗りつぶしについてはチャートライブラリの使い方(2)「データを塗りつぶす」 | hifive開発者ブログを参考にしてください。
これで完了です。後はボタンを押すだけで系列データが生成されてグラフが自動的に描画更新されます。
データを非同期で読み込んで描画する際にも利用できるでしょう。サンプルを参考の上、実装してみてください。
![]()
hifiveのチャートグラフの使い方です。今回は チャートライブラリの使い方(2)「データを塗りつぶす」 | hifive開発者ブログ と チャートライブラリの使い方(3)「データを追加する」 | hifive開発者ブログ を組み合わせて積み上げグラフを作ってみたいと思います。
サンプルはこちらになります。表示すると次のようなグラフになります。
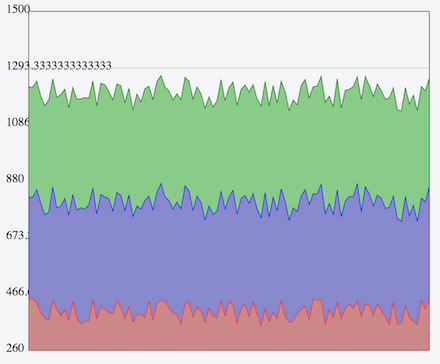
系列データを追加する
これは3回の時と同じですが、今回はさらに塗りつぶしの色と値の範囲を指定するようにしました。
This file contains hidden or bidirectional Unicode text that may be interpreted or compiled differently than what appears below. To review, open the file in an editor that reveals hidden Unicode characters.
Learn more about bidirectional Unicode characters
| var series = [ | |
| this._createNewSeries('red', '#c88', 50), | |
| this._createNewSeries('blue', '#88c', 30), | |
| this._createNewSeries('green', '#8c8', 10) | |
| ]; |
それに合わせて系列データを作成する _createNewSeries を変更します。
This file contains hidden or bidirectional Unicode text that may be interpreted or compiled differently than what appears below. To review, open the file in an editor that reveals hidden Unicode characters.
Learn more about bidirectional Unicode characters
| _createNewSeries: function(color, fillcolor, vibration) { | |
| var data = createChartDummyData(400, vibration); // ダミーデータを生成 | |
| // 系列定義 | |
| return { | |
| name: 'series_'+color, | |
| type: 'stacked_line', | |
| data: data, | |
| propNames: { | |
| y: 'val' | |
| }, | |
| fillColor: fillcolor, | |
| color: color | |
| }; | |
| } |
type を stacked_line とすることで積み上げグラフになります。さらにfillColorを指定することで塗りつぶす色が指定できます。
グラフを見ると分かりますが、積み上げグラフを配列で指定した前のデータの上に積み上げられます。これが折れ線グラフ(typeをlineに指定)にした場合にはデータが重なります。
このように折れ線グラフと積み上げグラフを必要に応じて切り替えられるようになっています。
サンプルはこちらにあります。チャートライブラリを使いこなしてユーザビリティの高い業務システムを構築してください。
![]()
最近にわかに注目を集め始めているのがWebAssemblyと呼ばれる技術です。アセンブリという単語でも分かる通り、Web上でコンパイルされたプログラムを使える技術になります。
今回はそんなWebAssemblyの紹介と、利点などについて紹介します。
コンパイルすればコードの隠蔽化が可能に
JavaScriptはスクリプト言語であり、良くも悪くもオープンな存在でした。そのため、Webブラウザで読み込まれたコードは誰でも閲覧が可能で、真似できました。それによってセキュリティ上の問題が出ることもありますが、JavaScriptが現在ほど広く使われるようになった一因とも言えるでしょう。
セキュリティ上、公開を避けたいキー系のデータについて、WebAssemblyによって隠蔽化ができるようになります。オープンという制約があるために、これまでサーバサイドでしか処理できなかったような内容がWebブラウザ側で実現できるようになります。さらにJavaScriptの使われる場面を増やせることでしょう。
Webブラウザではできなかったことを可能に
元々がPNaCl(とasm.js。後述)をベースにしていることもあり、Webブラウザ上でネイティブコードを安全に実行できるようになります。Webブラウザでは難しかった処理をこなすための存在です。
JavaアプレットやFlash、Silverlightといった技術が廃れたことで、Webブラウザ上でネイティブコードを動かす技術がなくなっています。HTML5もAPIが拡充されていますが、それでも足りない機能は多数あります。WebAssemblyはその一助になるでしょう。
転送量の低減
コンパイルすることによってスクリプトファイルに比べてサイズは低減できることが多いです。転送量が減るのは表示の高速化であったり、省メモリ化にも貢献してくれるでしょう。
最近のWebアプリケーションはどんどん肥大化する傾向にありますので、JavaScriptが1MBを超えることもあります。バイナリ化によってサイズが低減するのはユーザにとって大きなメリットになります。
開発言語について
現在のところ、C/C++からのコンパイルをサポートするのが目標となっています。さらにMozillaはRustでWebAssemblyをサポートすることを表明しています(1.14からサポート)。
asm.jsとの違い
Web上でのアプリケーション動作を高速化するために生み出された技術としてasm.jsが知られています。JavaScriptのサブセット版として開発されています。asm.jsでは標準のJavaScriptに比べて1.5倍程度高速化します。WebAssemblyではまだそのレベルまで達していないようですが、今後はパフォーマンスは向上するでしょう。
Webブラウザのサポート状況
2017年3月にリリースされたFirefox 52がWebAssemblyをサポートしました。さらにChromeやEdgeでも動作します(Chrome Canaryであったり、開発用のフラグを立てる必要があります)。WebAssemblyの開発にはAppleも参加していますので、今後ブラウザすべてで標準的にサポートされていくようになるでしょう。
今後WebAssemblyは標準になっていくことを考えると、C/C++によるWebブラウザ向けのアプリ開発も盛んになっていくことでしょう。もちろん現在は素のC/C++ですが、今後フレームワークも多数出てくるはずです。それによって開発が効率化すれば業務システム開発でも使えるようになるでしょう。
![]()
脆弱性診断は色々な分類がありますが、今回はWebアプリケーション用でフリーの脆弱性ツールをまとめてみました。
尚、本記事内にあるツールはサイトを攻撃するツールとしても利用出来てしまうため、利用にあたっては許可を得ていないサイトへの接続を行わないように注意して下さい。
Javaベースの脆弱性スキャナ OWASP ZAP
Javaベースで開発されたオープンソースのWebアプリケーション脆弱性検査ツールです。利用は無料です。
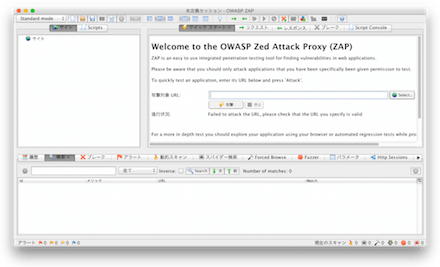
プロキシの自動スキャン、動的・静的スキャン、スパイダーなど多くの診断が可能です。 チュートリアルビデオもまとまっていて、その内容も初心者からセキュリティ専門家までカバーしています。
最初に導入する人が迷わないような仕組みと、UIにかなり力を入れているようで、ビデオ説明からもその部分がうかがえます。Ver2.4からメニューや操作部分などの日本語化も進んでいます。 動作環境もWindows/Mac/Linuxがサポートされていますが、JDK環境が必要になります。Dockerでのインストールもサポートしているようです。
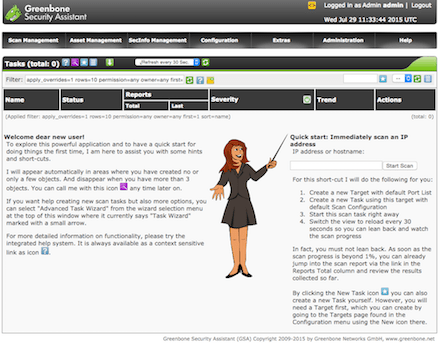
Nessusから派生した脆弱性スキャナ OpenVAS
かつてULinuxベースで開発されていたセキュリティスキャナ「Nessus」から派生したツールです。脆弱性データベースも日々更新されているようで、安心感が持てます。
Greebone Security AssistantというWebベースのGUIがあるので、利用はすぐできます。
参考までにセットアップまでの情報を載せておきます。
Step 1: Atomicorp のリポジトリを設定します。
$ wget -q -O - http://www.atomicorp.com/installers/atomic |sh
Step 2: OpenVASのクイックインストールコマンド
$ yum upgrade
$ yum install openvas
$ openvas-setup
Step 3: OpenVAS マネージャを起動します
service openvas-manager start
ブラウザで次のURLを開きます。
https://localhost:9392/
Perl製辞書ベースの脆弱性ツール nikto
Niktoは辞書ベースで脆弱性診断を行うツールとなっています。 辞書DBは、あまり頻繁に更新されないようですが、それでも一通りチェックするには十分だとおもいます。
Perlベースですので、Linux、Mac、Windowsでの利用が可能です。コマンドラインツールですが、利用方法も簡単で、出力結果もテキストベース、CSV, HTML, XMLなど実用十分です。 必要であれば、HTMLのカスタマイズも可能です。
以下は、参考までにローカル環境でテストしてみた結果です。
$ perl nikto.pl -h http://localhost

- Nikto v2.1.6
---------------------------------------------------------------------------
+ Target IP:          xxx.xxx.xxx.xxx
+ Target Hostname:    localhost
+ Target Port:        80
+ Start Time:         2015-07-29 18:12:37 (GMT9)
---------------------------------------------------------------------------
+ Server: Apache/2.4.6 (CentOS) PHP/5.6.10
+ Retrieved x-powered-by header: PHP/5.6.10
:::
::: 脆弱性対象があれば項目が表示されます・・・
:::
+ 9159 requests: 0 error(s) and 36 item(s) reported on remote host
+ End Time:           2015-07-29 18:25:26 (GMT9) (769 seconds)
---------------------------------------------------------------------------
+ 1 host(s) tested
Googleが開発した脆弱性ツール skipfish
skipfishは、辞書ベースのWebアプリケーションの脆弱性ツールです。 Linux, FreeBSD, MacOS X, and Windows (Cygwin)環境をサポートしています。
プロジェクトページの説明だと少々不親切ですので、簡単にCentOS環境でのセットアップから起動までを紹介しておきます。
1. 事前準備
libidn と libpcre3が必要とのことですので、予めインストールしておきましょう。
$ yum install openssl-devel
$ yum install pcre-devel
$ yum install libidn-devel
skipfishのビルド
次にプロジェクトページからskipfishをダウンロードして解凍し、makeで実行ファイルを作成します。
$ tar xvzf skipfish-2.10b.tgz
$ cd skipfish-2.10b
$ make
3. コマンド実行
次のコマンドは、-S オプションで辞書にcomplete.wlを利用し、-W- オプションで新しく辞書ファイルを作成しない場合です。
$ ./skipfish -S dictionaries/complete.wl -W- -o <出力ディレクトリ> <チェックするURL>
実行すると出力ディレクトリにHTMLで結果が生成されます。以下は実行結果のサンプルHTMLです。

辞書ファイルも最初に幾つか用意されていますので、すぐに試す事が可能です。こちらも非常に簡単に脆弱性の確認ができますし、CLIベースですのでプロジェクトのCIに組み込んでも良さそうです。
ウェブサーバのアクセスログから攻撃を検出 iLogScanner
IPA(独立行政法人情報処理推進機構)から提供されているツールで、Webのアクセスログから攻撃を検知するツールです。オンライン版はJavaアプレット、オフライン版はJavaSDKが必要です。サポート対象はWindowsのみとなっておりますが、MacOSX 10.10.4 でも動作確認ができました。
以下は、オフライン版の画面です。

実行すると検知結果が表示されます。
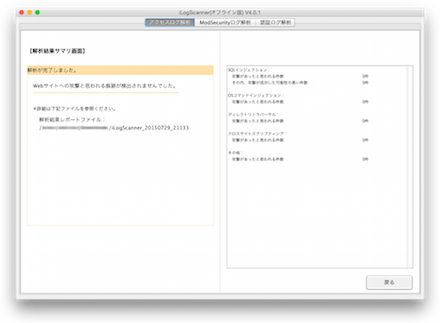
アクセスログの痕跡を元に攻撃を検知するアプローチで、運用時の未知のアクセスにも、いち早く攻撃を確認する指標になると思います。運用後に大変有効なツールになるのではないでしょうか。
脆弱性体験学習ツール AppGoat
最後はセキュリティの学習ツールの紹介です。IPA(独立行政法人情報処理推進機構)から提供されている、学習体験用のWebアプリです。Windowsアプリとなっていて、実行するとローカルサーバが立ち上がります。
基本的な脆弱性体験やその対策が学べるのはもちろんですが、上記でご紹介した脆弱性ツールの確認としても使えると思います。
最後に
開発するWebサイトは、悪意のあるアタッカーからの攻撃で常に危険にさらされています。その攻撃手法も複雑化していますが、脆弱性ツールもそれに合わせて進歩していますので定期的な実行を行っておくと安全性を保てるでしょう。
日頃から脆弱性に対して注意払うことが、Webアプリケーションを少しでも堅牢にすることに繋がります。ぜひ記事中で取り上げたツールを使い、Webサーバのセキュリティ診断を行ってみてください。
![]()
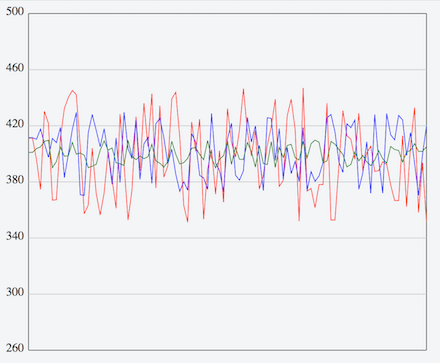
前回のグラフの基本形を使って、今回はデータを追加する方法を紹介します。
実際に描画すると次のようになります。コードはこちらにあります。

3つのデータ系列を表示しています。
シリーズデータを追加する
元々シリーズは配列で与えていましたが、これを追加します。
This file contains hidden or bidirectional Unicode text that may be interpreted or compiled differently than what appears below. To review, open the file in an editor that reveals hidden Unicode characters.
Learn more about bidirectional Unicode characters
| var series = [ | |
| this._createNewSeries('blue'), | |
| this._createNewSeries('red'), | |
| this._createNewSeries('green') | |
| ]; |
引数としてグラフの色を変えるようにしています。 _createNewSeries もこれに合わせて変更します。
データ系列の名前をユニークにする
大事なのは、nameプロパティをユニークにしておくということです。今回はnameプロパティに指定した色名を加えています。
This file contains hidden or bidirectional Unicode text that may be interpreted or compiled differently than what appears below. To review, open the file in an editor that reveals hidden Unicode characters.
Learn more about bidirectional Unicode characters
| _createNewSeries: function(color) { | |
| var data = createChartDummyData(400, 100); // ダミーデータを生成 | |
| // 系列定義 | |
| return { | |
| name: 'series_'+color, | |
| type: 'line', | |
| data: data, | |
| propNames: { | |
| y: 'val' | |
| }, | |
| color: color | |
| }; | |
| } |
後はcolorプロパティに対して色を指定するだけです。
これだけで複数のデータをグラフに描画できるようになります。
nameプロパティをユニークにすることさえ注意すればhifiveのチャートライブラリを簡単に使いこなせるでしょう。ぜひサンプルで確認してください。
![]()
前回のデモをベースに今回はデータに塗りつぶし処理を加えてみたいと思います。累積グラフなどを作る際に利用できるでしょう。
サンプルはこちらにあります。実行した際の画像は下記の通りです。
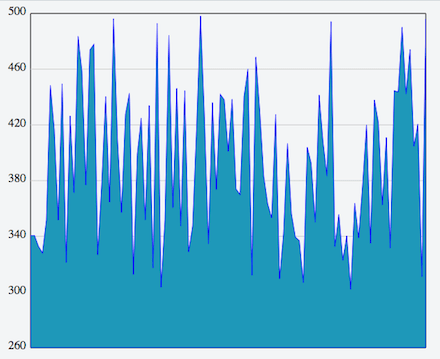
基本になるグラフは前回のものになります。今回はそれに加えた変更ポイントについて紹介します。
系列データの種類を変更
系列データを line から stacked_line に変更します。これでデータ範囲が塗りつぶされます。
fillColorプロパティを追加
fillColorに対して色設定(色名またはRGB)を指定します。これで塗りつぶす色が設定されます。
修正後は次のようになります。
This file contains hidden or bidirectional Unicode text that may be interpreted or compiled differently than what appears below. To review, open the file in an editor that reveals hidden Unicode characters.
Learn more about bidirectional Unicode characters
| // 系列定義 | |
| return { | |
| name: 'series_1', | |
| type: 'stacked_line', // lineから変更 | |
| data: data, | |
| propNames: { | |
| y: 'val' | |
| }, | |
| fillColor: "#1E98B9", // 色を設定 | |
| color: 'blue' | |
| }; |
これだけで塗りつぶされたグラフになります。
とても簡単な指定でグラフの種類を変更できます。ぜひサンプルで確認してください。
![]()
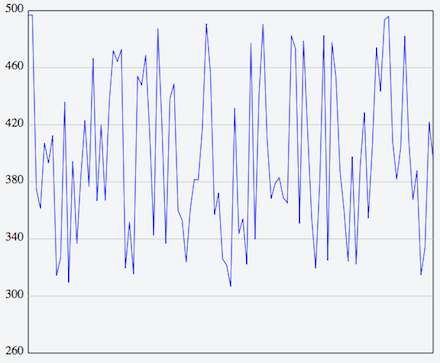
今回から何回かに分けてhifiveのチャートライブラリの使い方を紹介します。
まず今回はごく基本的な折れ線グラフを描いてみます。
サンプルはこちらにあります。結果は次のようなグラフになります。
チャートライブラリの読み込み
チャートを描く際には通常のhifiveに加えて、以下のライブラリを読み込みます。
グラフを表示する
まずHTMLは次のようになります。
This file contains hidden or bidirectional Unicode text that may be interpreted or compiled differently than what appears below. To review, open the file in an editor that reveals hidden Unicode characters.
Learn more about bidirectional Unicode characters
| <div id="chart" ></div> |
次にJavaScriptの基本形です。 h5.ui.components.chart.ChartController を読み込みます。
This file contains hidden or bidirectional Unicode text that may be interpreted or compiled differently than what appears below. To review, open the file in an editor that reveals hidden Unicode characters.
Learn more about bidirectional Unicode characters
| var pageController = { | |
| __name: 'ui.chart.pageController', | |
| _chartController: h5.ui.components.chart.ChartController, // チャートライブラリ | |
| __meta: { | |
| _chartController: { | |
| // グラフを表示するdivタグのIDです。 | |
| rootElement: '#chart' | |
| } | |
| }, | |
| __ready: function(context) { | |
| // 表示処理を行います | |
| }; | |
| } | |
| h5.core.expose(pageController); |
続いて __ready の内容です。 series はダミーデータが入ります。配列で複数のデータを定義できます。
This file contains hidden or bidirectional Unicode text that may be interpreted or compiled differently than what appears below. To review, open the file in an editor that reveals hidden Unicode characters.
Learn more about bidirectional Unicode characters
| var series = [this._createNewSeries()]; |
その後はチャートコントローラの初期定義になります。表示範囲、表示方法などを定義します。
This file contains hidden or bidirectional Unicode text that may be interpreted or compiled differently than what appears below. To review, open the file in an editor that reveals hidden Unicode characters.
Learn more about bidirectional Unicode characters
| this._chartController.draw({ | |
| chartSetting: { | |
| width: 600, | |
| height: 480 | |
| }, | |
| axes: { | |
| xaxis: { | |
| off: true | |
| }, | |
| yaxis: { // y軸 | |
| lineNum: 6, // y軸の補助線の数(上部は含む) | |
| fontSize: '12pt', // ラベルのフォントサイズ | |
| autoScale: function(min, max) { // オートスケールの定義 | |
| return { | |
| rangeMax: Math.ceil(max / 500) * 500, | |
| rangeMin: 260 | |
| }; | |
| }, | |
| } | |
| }, | |
| seriesDefault: { // すべての系列のデフォルト設定 | |
| dispDataSize: 100, | |
| }, | |
| series: series | |
| // 系列データ | |
| }); |
ダミーデータを生成するメソッドです。系列データをオブジェクトで返します。
This file contains hidden or bidirectional Unicode text that may be interpreted or compiled differently than what appears below. To review, open the file in an editor that reveals hidden Unicode characters.
Learn more about bidirectional Unicode characters
| _createNewSeries: function() { | |
| var data = createChartDummyData(400, 100); // ダミーデータを生成 | |
| // 系列定義 | |
| return { | |
| name: 'series_1', | |
| type: 'line', | |
| data: data, | |
| propNames: { | |
| y: 'val' | |
| }, | |
| color: 'blue' | |
| }; | |
| } |
今回は折れ線グラフなので line としています。塗りつぶす場合には stacked_line が使えます(別途背景色も指定します)。線の色は青です。
ダミーデータを返している createChartDummyData には 400 と 100 という2つの引数が設定してあります。これは400を中心に±100(300〜500)のデータを生成します。生成されるデータは val というキーを持っています。
This file contains hidden or bidirectional Unicode text that may be interpreted or compiled differently than what appears below. To review, open the file in an editor that reveals hidden Unicode characters.
Learn more about bidirectional Unicode characters
| [ | |
| {val: 300}, | |
| {val: 420}, | |
| {val: 320}, | |
| : | |
| ] |
このようなデータ形式になっている必要があります。
今回のサンプルはこちらにあります。業務システムにおいてチャートはよく使われるものです。使い方を覚えてしまえばhifiveで簡単に描けるようになります。次回以降、このサンプルをベースに機能を追加説明していきます。
![]()
