年
月
カレンダーコンポーネントの使い方、第三弾です。今回はカレンダーの日付選択方式を変更します。
実際に動いているデモはこちらにあります。
使い方
HTMLは次のようになります。選択方式の3パターンを設定できるようにしただけです。
This file contains hidden or bidirectional Unicode text that may be interpreted or compiled differently than what appears below. To review, open the file in an editor that reveals hidden Unicode characters.
Learn more about bidirectional Unicode characters
| <div id="container"></div> | |
| <p> | |
| <input type="radio" class="select" name="select" value="single" /> 一日ごとの選択 <br /> | |
| <input type="radio" class="select" name="select" value="continue" /> 連続選択 <br /> | |
| <input type="radio" class="select" name="select" value="multi" /> 複数日付 <br /> | |
| </p> |
JavaScriptは次のようになります。ラジオボタンの選択した値をそのまま適用しています。
This file contains hidden or bidirectional Unicode text that may be interpreted or compiled differently than what appears below. To review, open the file in an editor that reveals hidden Unicode characters.
Learn more about bidirectional Unicode characters
| $(function(){ | |
| var mainController = { | |
| __name : 'h5.ui.container.MainController', | |
| calendarController: h5.ui.components.Calendar, | |
| __meta : { | |
| calendarController: { | |
| rootElement: '#container' | |
| }, | |
| }, | |
| __init: function(){ | |
| this.$find(".select:first").attr("checked", true); | |
| }, | |
| '.select click': function(context, $el) { | |
| this.calendarController.setSelectMode($el.val()); | |
| }, | |
| }; | |
| h5.core.controller('body', mainController); | |
| }); |
選択モード
選択モードは全部で3つあります。まずデフォルトの1日選択モードです。

次に2回クリックすると、その間の日付をすべて選択状態にするモードです。
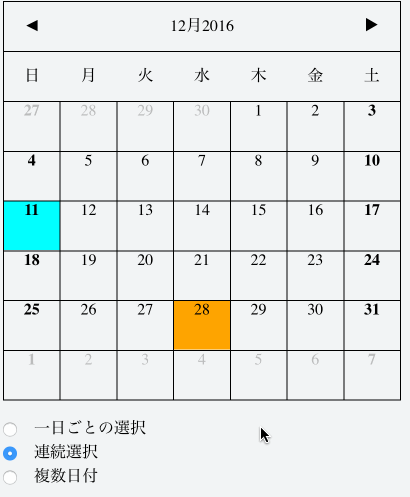
最後に複数の日付を選択できるモードです。

それぞれ必要に応じて使い分けられます。
ホテルや旅行の場合、一気に複数の日付を選択できるのが便利です。複数日付の選択もよく使われる方法です。業務要件に合わせて最適なものを設定してください。
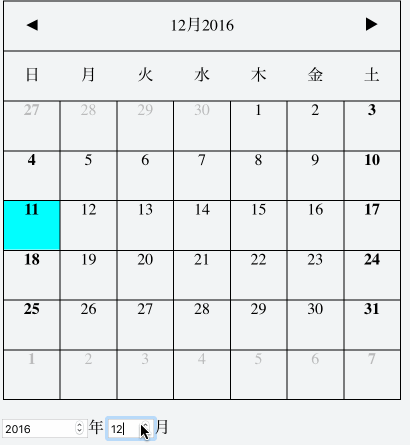
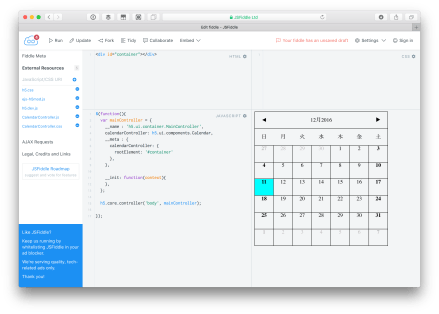
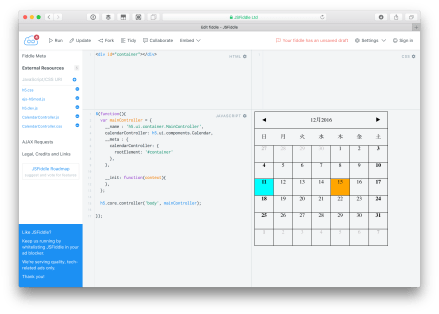
カレンダーコンポーネントの使い方、第二弾です。今回は特定の年月を指定して、その月のカレンダーを表示する方法です。
実際に動いているデモはこちらにあります。また、動いている際には次のようになります。
使い方
HTMLは年月を指定するタグを追加しただけです。
JavaScriptは次のようになります。入力したタイミングでsetYear/setMonthを呼び出すだけです。
This file contains hidden or bidirectional Unicode text that may be interpreted or compiled differently than what appears below. To review, open the file in an editor that reveals hidden Unicode characters.
Learn more about bidirectional Unicode characters
| $(function(){ | |
| var mainController = { | |
| __name : 'h5.ui.container.MainController', | |
| calendarController: h5.ui.components.Calendar, | |
| __meta : { | |
| calendarController: { | |
| rootElement: '#container' | |
| }, | |
| }, | |
| __init: function(){ | |
| var d = new Date; | |
| this.$find("#year").val(d.getFullYear()); | |
| this.$find("#month").val(d.getMonth() + 1); | |
| }, | |
| '#year change': function(context, $el) { | |
| this.calendarController.setYear($el.val()); | |
| }, | |
| '#month change': function(context, $el) { | |
| if ($el.val() != 12) { | |
| $el.val($el.val() % 12); | |
| } | |
| this.calendarController.setMonth($el.val() – 1); | |
| } | |
| }; | |
| h5.core.controller('body', mainController); | |
| }); |
カレンダーの移動は元々表示されている三角マークで行うか、来月または先月の日付を選択する、JavaScript側で行うかの3種類になります。JavaScriptから制御できるので、自由にカスタマイズできるでしょう。
PDFはビジネスの基本フォーマットになっています。閲覧するだけという方が多いかと思いますが、もっと活用できます。PDFから必要な情報を抜き出したり、システムから出力したりできれば、業務がもっと改善できるはずです。
そこで今回はPDFをWebブラウザ上で扱えるライブラリを紹介します。
paperai/pdfanno: Linguistic Annotation and Visualization Tool for PDF Documents

PDFに注釈を入れられます。表示されている文字列を選択して注釈を入れられるようになっています。他にも四角で囲んだり、注釈同士をリンクさせることもできます。
paperai/pdfanno: Linguistic Annotation and Visualization Tool for PDF Documents
instructure/pdf-annotate.js: Annotation layer for pdf.js

PDFはPDF.jsというJavaScriptライブラリで表示されており、そのPDF上で文字を書いたり、マウスで自由線を引いたりできます。PDFファイルの回転表示もサポートしています。表示を変更するのではなく、コメントを付けることもできます。
instructure/pdf-annotate.js: Annotation layer for pdf.js
azu/pdf.js-controller: Provide presentation interface using pdf.js
PDFを読み込み、プレゼンテーションとして表示するライブラリです。こちらもまた、PDF.jsを使っています。アウトラインを出したり、ツリービューのような表示も行えます。PDFの資料をそのままプレゼンするのに便利そうです。
azu/pdf.js-controller: Provide presentation interface using pdf.js
manuels/texlive.js: Compiling LaTeX (TeX live) in your browser
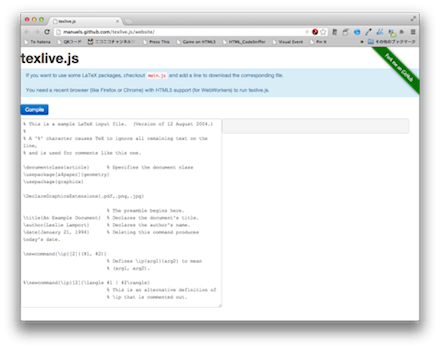
論文などを書くのに向いたフォーマットのLaTeXをPDFに変換します。もちろんWebブラウザだけで実現します。画像、リスト、式などLaTeXの文法がそのまま使えます。動作は重たいですが、サーバサイドやローカルに変換環境を用意しないでも良いのは便利そうです。
manuels/texlive.js: Compiling LaTeX (TeX live) in your browser
いかがでしょうか。クライアントサイドだけでもPDFに対して様々な操作ができるのが分かるでしょうか。特にMozillaの開発したPDF.jsによってPDFファイルをJavaScriptで操作しやすくなりました。その結果、PDFファイルを読み込んで、そこから必要な情報を手軽に得られるようになっています。
ぜひ閲覧だけでなく、PDFファイルを業務システムで活用してください。
プッシュ通知といえば、スマホアプリ用のものというイメージが強いかもしれませんが、ChromeがWebサイトを閉じていてもプッシュ通知ができる機能をリリースしたりと、Webサイトにも広がってきています。今回は、プッシュ通知サービスを気軽に試して検討できるように、数多くあるプッシュ通知サービスの中から無料で始められるものをまとめました(トライアル期間制限や回数制限があるものも含みます)。
プッシュさん
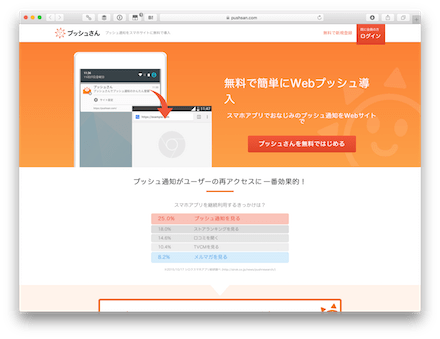
アプリがなくてもwebサイトからプッシュ通知が送れるサービス。Google Chromeの新しいプッシュ通知機能を利用したもので、Chromeのバージョン42以上が対応。Androidに対応しています。シンプルな操作画面でありながら、A/Bテストやセグメンテーション配信、配信予約など高機能なところも注目点です。
pushnate
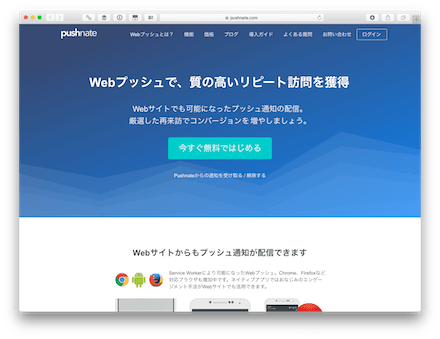
日時指定や毎日・毎週など希望のタイミングで定期配信ができます。また、メールマーケティングのように予め設定したスケジュールでプッシュ配信することができ、ステップメールのような使い方も可能です。JavaScriptを貼るだけで導入開始できます。現在、ベータ版で今後サービス内容追加の予定とのことで、今後のサービス追加にも注目のサービスです。
bpush
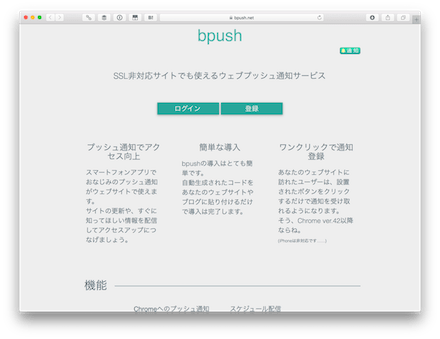
PC版とAndroid版のChromeに対して、プッシュ通知を送信できるサービスです。Google Chrome 42以降対応。iOS非対応です。設置はタグをサイトに貼り付けるだけで始められます。送信時刻指定のスケジュール配信やサイトのRSS情報をチェックし、自動配信することができます。また、bpushが用意したAPIにより外部ツールとの連携も可能です。
Push7
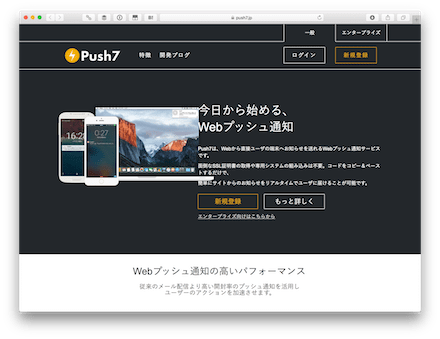
アプリを開発することなく、スマートフォンやPCにプッシュ通知を送れます。プッシュ通知を見たユーザーがどのようなアクションを起こしたかなど詳細な統計情報を見ることができます。同様のサービスがiOS非対応のものが多い中、iOSに対応しています。さまざまなAPIを搭載すると共にWordPressに対応した拡張機能が特徴的です。CMSの更新やRSSの自動更新でのプッシュ通知に対応しています。
LogPush
500万デバイスまですべての機能が無料のスマートフォン向けのプッシュ通知配信サービス。対象ユーザーを絞り込んで配信するユーザーセグメント機能や配信ルール作成による定期配信、内容を変えながらベストな配信方法をテストしていくABテスト機能など、豊富な機能があります。
いかがでしたでしょうか。プッシュ通知の豊富なサービスを実際に配信しながら、確かめていけるのは大きなメリットでしょう。プッシュ通知はユーザーにwebサイトやアプリへの再訪を促すのに力を発揮するサービスですので、効果的に活用していきたいですね。
業務要件でカレンダーを使いたいという話はよくあります。プロジェクトの日付を出したり、レストランや美容院、ホテルなどの予約を出すようなケースも使われるでしょう。しかしいざ作ろうと思うと日付の曜日に合わせた表示や別な月への移動などは面倒な処理です。
そこでhifiveのカレンダーコンポーネントを紹介します。これを使えばカスタマイズも容易なカレンダーが素早く実装できます。
実際に動いているデモはこちらにあります。ぜひご覧ください。
使い方
まず基本になるHTMLですが、たった1行です。
This file contains hidden or bidirectional Unicode text that may be interpreted or compiled differently than what appears below. To review, open the file in an editor that reveals hidden Unicode characters.
Learn more about bidirectional Unicode characters
| <div id="container"></div> |
次にカレンダーの表示を行うJavaScriptは次のように書きます。
This file contains hidden or bidirectional Unicode text that may be interpreted or compiled differently than what appears below. To review, open the file in an editor that reveals hidden Unicode characters.
Learn more about bidirectional Unicode characters
| $(function(){ | |
| var mainController = { | |
| __name : 'h5.ui.container.MainController', | |
| calendarController: h5.ui.components.Calendar, | |
| __meta : { | |
| calendarController: { | |
| rootElement: '#container' | |
| }, | |
| }, | |
| __init: function(){ | |
| } | |
| }; | |
| h5.core.controller('body', mainController); | |
| }); |
これだけでカレンダーが表示できます。
標準で用意されている機能
この標準のままでは、日付の選択が可能です。
さらに別な月のカレンダーに移動ができます。

標準の機能だけで使うことはほぼないと思います。次回以降、カスタマイズ法を紹介します。
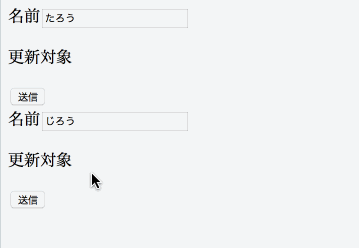
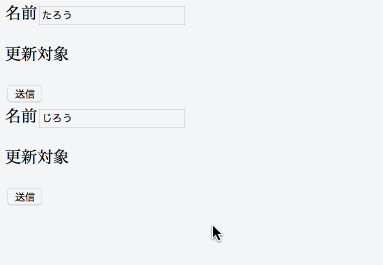
引き続きApplicationControllerを使ったAjax処理の省力化について紹介します。今回はフォームのターゲット指定です。
通常、フォーム送信した結果は同じフォームを更新対象にしますが、場合によっては別なフォームを対象にしたいこともあるでしょう。ApplicationControllerではごく簡単に実装できます。
実装方法としては target を指定します。それだけで更新対象を指定できます。
This file contains hidden or bidirectional Unicode text that may be interpreted or compiled differently than what appears below. To review, open the file in an editor that reveals hidden Unicode characters.
Learn more about bidirectional Unicode characters
| <form action="jsp/welcome-json.jsp" name="form1" target="form2"> | |
| <label>名前</label><input type="text" class="name" value="たろう" /> | |
| <p data-h5-bind="message">更新対象</p> | |
| <input type="submit" /> | |
| </form> | |
| <form action="jsp/welcome-json.jsp" name="form2" target="form1"> | |
| <label>名前</label><input type="text" class="name" value="じろう" /> | |
| <p data-h5-bind="message">更新対象</p> | |
| <input type="submit" /> | |
| </form> |
JavaScriptは変わりません。特別な設定は不要です。
This file contains hidden or bidirectional Unicode text that may be interpreted or compiled differently than what appears below. To review, open the file in an editor that reveals hidden Unicode characters.
Learn more about bidirectional Unicode characters
| $(function() { | |
| h5.core.controller('body', h5.ui.container.ApplicationController); | |
| }); |
これだけでフォームを送信すると別なフォームが更新されるようになります。インジケータが送信ボタンを押したものとは違うフォームで回っているのが分かります。
実際のデモはこちらにて確認できます。サーバ送信部分はモックですが、サーバを立てた場合と同じです。
業務要件などが複雑な場合、フォームを入れ子にできず苦労するかも知れません。しかしこの方法であれば別なフォームをターゲットに指定にてボタンだけ別に配置すると言った使い方も考えられるのではないでしょうか。
引き続きApplicationControllerを使ったAjax処理の省力化について紹介します。今回はフォームの同時送信です。
HTMLでは基本的に一回のアクションで一つのフォームしか送信できません。しかしAjaxであれば並行処理を使って同時送信も可能です。ApplicationControllerではごく簡単に実装できます。
実装方法としては h5-refresh-group を指定します。この名前が同じであれば、同時に送信されるようになります。
This file contains hidden or bidirectional Unicode text that may be interpreted or compiled differently than what appears below. To review, open the file in an editor that reveals hidden Unicode characters.
Learn more about bidirectional Unicode characters
| <form action="jsp/welcome-json.jsp" h5-refresh-group="group"> | |
| <label>名前</label><input type="text" class="name" name="name" value="たろう" /> | |
| <p data-h5-bind="message">更新対象</p> | |
| <input type="submit" /> | |
| </form> | |
| <form action="jsp/welcome-json.jsp" h5-refresh-group="group"> | |
| <label>名前</label><input type="text" class="name" name="name" value="じろう" /> | |
| <p data-h5-bind="message">更新対象</p> | |
| <input type="submit" /> | |
| </form> |
JavaScriptは変わりません。特別な設定は不要です。
This file contains hidden or bidirectional Unicode text that may be interpreted or compiled differently than what appears below. To review, open the file in an editor that reveals hidden Unicode characters.
Learn more about bidirectional Unicode characters
| $(function() { | |
| h5.core.controller('body', h5.ui.container.ApplicationController); | |
| }); |
これだけでフォームを送信すると二つのフォームが同時に送信されるようになります。インジケータも二つ同時に回っているのが分かります。
実際のデモはこちらにて確認できます。サーバ送信部分はモックですが、サーバを立てた場合と同じです。
二つの要素を同時に更新したいという時に使えます。特に、フォーム内で同じnameであったとしても使えるのが利点と言えるでしょう(通常のHTMLで、一つのフォーム内に同じname指定があると上書きしてしまいます)。
引き続きApplicationControllerを使ったAjax処理の省力化について紹介します。今回は要素の追加(前後)と更新についてです。
サーバからのレスポンスに対して、その結果をHTML内に追加したい時と、元のHTMLを書き換えたい場合があります。ApplicationControllerでは h5-bind-target を使って指定できます。
HTMLは次のようになります。appendが後ろに追加、prependが前に追加そしてupdateがHTMLの内容を更新するという指定になります。
This file contains hidden or bidirectional Unicode text that may be interpreted or compiled differently than what appears below. To review, open the file in an editor that reveals hidden Unicode characters.
Learn more about bidirectional Unicode characters
| <form action="jsp/welcome-json.jsp"> | |
| <label>名前</label><input type="text" id="name" name="name" value="たろう" /> | |
| <p h5-bind-target="append">後に追加:</p> | |
| <p h5-bind-target="prepend">前に追加:</p> | |
| <p h5-bind-target="update">更新:</p> | |
| <input type="submit" /> | |
| </form> |
JavaScript側は次のように特に変わりません。
This file contains hidden or bidirectional Unicode text that may be interpreted or compiled differently than what appears below. To review, open the file in an editor that reveals hidden Unicode characters.
Learn more about bidirectional Unicode characters
| $(function() { | |
| h5.core.controller('body', h5.ui.container.ApplicationController); | |
| }); |
これを実行すると次のようになります。

それぞれ表示結果が異なるのが分かるかと思います。
実際のデモはこちらにて確認できます。サーバ送信部分はモックですが、サーバを立てた場合と同じです。
リスト要素への追加であれば前後、どちらの可能性もあります。結果をメッセージとして表示するのであればupdateを指定するのが良いでしょう。目的に応じて使い分けてください。
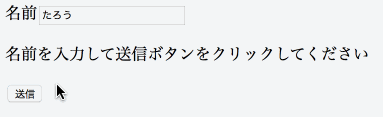
Ajax処理がごく簡単になるApplicationControllerを紹介します。前回はHTML全体を書き換えていましたが、それでは再送できなかったり、不便なことがあるかも知れません。
そこで今回は名前を指定して画面上の一部を更新する方法を紹介します。
今回のHTMLも前回と基本的に同じです。
This file contains hidden or bidirectional Unicode text that may be interpreted or compiled differently than what appears below. To review, open the file in an editor that reveals hidden Unicode characters.
Learn more about bidirectional Unicode characters
| <form action="jsp/welcome-json.jsp"> | |
| <label>名前</label><input type="text" id="name" name="name" value="たろう" /> | |
| <p data-h5-bind="message">名前を入力して送信ボタンをクリックしてください</p> | |
| <input type="submit" /> | |
| </form> |
そしてApplicationControllerも前回と同じです。たったこれだけでサーバへのAjax送信、インジケータ表示、レスポンスのハンドリングができます。
This file contains hidden or bidirectional Unicode text that may be interpreted or compiled differently than what appears below. To review, open the file in an editor that reveals hidden Unicode characters.
Learn more about bidirectional Unicode characters
| $(function() { | |
| h5.core.controller('body', h5.ui.container.ApplicationController); | |
| }); |
サーバからのレスポンスですが、text/jsonで返すのが特徴です。そしてHashの中でキーと値で新しいコンテンツを返します。
This file contains hidden or bidirectional Unicode text that may be interpreted or compiled differently than what appears below. To review, open the file in an editor that reveals hidden Unicode characters.
Learn more about bidirectional Unicode characters
| // ダミー実行 | |
| $.ajax = function(data) { | |
| var name = $("#name").val(); | |
| var deffered = h5.async.deferred(); | |
| var p = deffered.promise(); | |
| p.dataTypes = ["text", "json"]; | |
| setTimeout(function() { | |
| deffered.resolve({ | |
| message: name+"さん、こんにちは" | |
| }); | |
| }, 1000); | |
| return p; | |
| } |
これで実行するとフォーム内の一部だけを更新するようになります。
実際のデモはこちらにて確認できます。サーバ送信部分はモックですが、サーバを立てた場合と同じです。
ApplicationControllerを使えばAjax処理が簡単になるでしょう。
最近のWebアプリケーションではAjaxを使うのが当たり前になっています。そしてAjaxでフォームデータを送信した後、データをハンドリングして画面を更新したりします。これはよくあるコードであり、最近の開発でよくいうDRY(Don’t repeat yourself)に反すると言えます。
hifiveではそのようなごく基本的なAjax処理についてApplicationControllerでほぼコーディングなしで実装できるようになっています。今回はその基本形の紹介です。
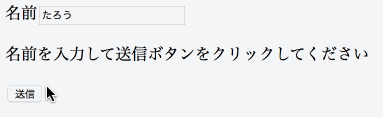
例えば次のようなHTMLがあります。
This file contains hidden or bidirectional Unicode text that may be interpreted or compiled differently than what appears below. To review, open the file in an editor that reveals hidden Unicode characters.
Learn more about bidirectional Unicode characters
| <form action="app.jsp"> | |
| <label>名前</label><input type="text" id="name" name="name" value="たろう" /> | |
| <p data-h5-bind="message">名前を入力して送信ボタンをクリックしてください</p> | |
| <input type="submit" /> | |
| </form> |
これは app.jsp に対してnameデータを送信するものと言えます。これに対してhifiveで次のように h5.ui.container.ApplicationController を適用します。
This file contains hidden or bidirectional Unicode text that may be interpreted or compiled differently than what appears below. To review, open the file in an editor that reveals hidden Unicode characters.
Learn more about bidirectional Unicode characters
| $(function() { | |
| h5.core.controller('body', h5.ui.container.ApplicationController); | |
| }); |
これで実行するとWebブラウザは表示をリフレッシュせず、Ajaxで送信を行います。そして結果をそのままフォーム全体にして適用します。
この時のレスポンスはサーバからHTMLをそのまま返しています。
実際のデモはこちらにて確認できます。サーバ送信部分はモックですが、サーバを立てた場合と同じです。
インジケータを出すような表示も自動で行ってくれます。ApplicationControllerを使えばAjax実装がごく簡単になるでしょう。
